All products are selected by our editorial team for quality. If you buy through our links, we may earn a small commission at no extra cost to you.
Making ice cream at home can be an incredibly rewarding experience, and with the help of the Ninja Creami, it’s easier than ever to create a velvety, creamy dessert in no time.
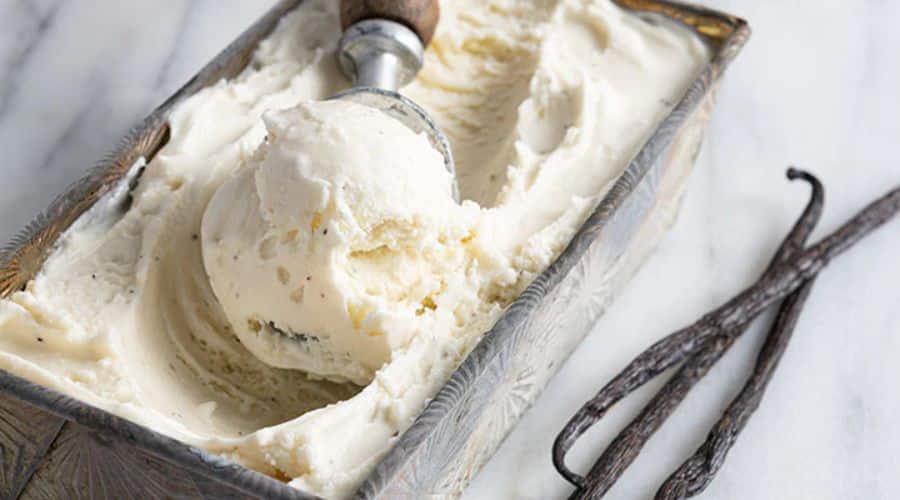
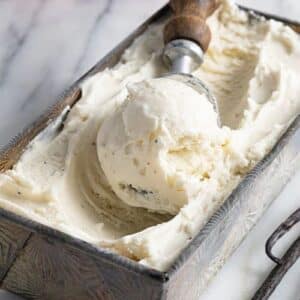
One flavor that’s universally loved for its richness and versatility is Vanilla Bean. Unlike the plain vanilla extract, vanilla bean ice cream bursts with a more aromatic, natural vanilla flavor.
The tiny specks of vanilla bean throughout the ice cream add a beautiful touch of elegance and texture.
In this recipe, we will guide you step by step through the process of making Ninja Creami Vanilla Bean Ice Cream, a luscious dessert that’s bound to impress.
Whether served on its own, paired with fresh fruit, or added to pies and cakes, this homemade ice cream is a true delight.
The best part? You’ll be able to make it in the comfort of your own kitchen, with minimal effort but maximum flavor.
Health Benefits of Vanilla Bean Ice Cream
- Good Source of Healthy Fats: The heavy cream and whole milk provide essential fats that support brain function and energy levels.
- Rich in Calcium: Dairy ingredients contribute to strong bones and teeth by supplying calcium and phosphorus.
- Natural Antioxidants: Vanilla beans contain antioxidants that help combat oxidative stress and support overall cell health.
- Mood Booster: Vanilla’s natural aroma has been linked to reducing stress and anxiety while promoting relaxation.
- Quick Energy Source: The combination of sugars and fats provides a quick energy boost, making it a satisfying dessert in moderation.
Ingredients for Ninja Creami Vanilla Bean Ice Cream
To make this Ninja Creami Vanilla Bean Ice Cream, you’ll need a few simple ingredients. Here’s everything you’ll need to get started:
Heavy Cream: This forms the base of the ice cream, giving it that ultra-creamy texture.
Whole Milk: Adds a smooth consistency and balances out the richness of the cream.
Granulated Sugar: Sweetens the mixture perfectly.
Vanilla Bean Pods: The key ingredient that will elevate your ice cream with its deep, aromatic flavor. Using whole vanilla beans ensures you get the best flavor and those lovely flecks in the ice cream.
Pinch of Salt: Enhances the sweetness and overall flavor of the ice cream.
Vanilla Extract (optional): You can add a little bit to complement the vanilla beans, but it’s optional if you prefer a purer vanilla taste.
These ingredients come together to create a truly indulgent ice cream, full of that fresh, homemade goodness that will make you never want to buy store-bought vanilla again.
Preparing the Vanilla Bean Base

The key to getting the most out of your vanilla beans lies in how you prepare them. Here’s how to properly extract the seeds from the vanilla bean pods for your Ninja Creami Vanilla Bean Ice Cream:
Extracting Vanilla Bean Seeds
First, take your vanilla beans and use a sharp knife to slice each pod lengthwise. Be careful not to cut too deeply.
Once the pod is open, use the back of the knife to gently scrape out the tiny black seeds inside.
These little specks are where all the magic happens—they contain the rich, fragrant oils that give your ice cream its signature flavor.
Set the seeds aside and be sure to save the pods, as they can be used to infuse other desserts or drinks.
Making the Ice Cream Mixture
In a medium mixing bowl, combine your heavy cream, whole milk, granulated sugar, and the vanilla bean seeds.
Stir gently to combine, making sure the sugar dissolves completely.
You want to ensure that the vanilla bean seeds are evenly distributed throughout the mixture, as this will give you that characteristic speckled look and burst of flavor in every bite.
Add a small pinch of salt to the mixture—this will help balance the sweetness and bring out the natural flavors of the vanilla.
Once your base is fully combined, it’s time to move on to the next step of chilling the base before processing with the Ninja Creami.
Using the Ninja Creami to Make Ice Cream
Once your vanilla bean base is ready, it’s time to bring the magic to life with the Ninja Creami.
This appliance makes the process incredibly simple, ensuring a smooth, creamy texture that rivals store-bought ice cream.
Set-Up the Ninja Creami
Start by pouring your chilled vanilla bean mixture into the Ninja Creami pint container.
Be sure to leave some space at the top, as the ice cream mixture will expand as it freezes.
Secure the lid tightly on the pint container before placing it into the Ninja Creami machine.
Choosing the Right Program
Now comes the fun part! Select the “Ice Cream” setting on your Ninja Creami.
This program is specifically designed for making the creamiest ice cream, ensuring a smooth texture without ice crystals.
If your ice cream is too soft after the first round of processing, you can select the “Re-spin” setting to achieve the desired consistency.
Processing and Texture
Let the Ninja Creami work its magic. The processing time is typically a few minutes, during which the machine will break down the frozen base and turn it into a luscious, creamy ice cream.
After processing, you should have a soft, scoopable texture. If you prefer a firmer ice cream, place the pint back into the freezer for a few hours to solidify.
Recipe Variation
- Dairy-Free Version: Substitute heavy cream and whole milk with full-fat coconut milk or a mix of almond milk and coconut cream for a plant-based alternative.
- Low-Sugar Option: Replace granulated sugar with a sugar substitute like monk fruit sweetener or erythritol for a lower-calorie treat.
- Flavor Infusions: Add a splash of bourbon or rum for a more complex flavor, or mix in a teaspoon of instant espresso powder for a subtle coffee kick.
- Chocolate Swirl: After processing, fold in a homemade chocolate sauce or melted dark chocolate for a marbled effect.
- Fruit-Infused: Blend in puréed berries, mango, or peaches before freezing to add natural sweetness and a fruity twist.
Serving Suggestions
Classic Style: Serve in a waffle cone or a chilled bowl for a simple yet indulgent treat.
Topped Delight: Garnish with fresh berries, chopped nuts, or a drizzle of caramel or hot fudge for extra texture and flavor.
Pair with Desserts: Enjoy alongside warm brownies, apple pie, or freshly baked cookies for a delightful contrast of temperatures.
Milkshake Magic: Blend with a splash of milk for a rich, creamy vanilla milkshake.
Affogato Twist: Pour a shot of hot espresso over a scoop of ice cream for a luxurious affogato-style dessert.
Storage Guide
Freezing: Store the prepared ice cream in an airtight container in the freezer for up to 2 weeks.
For best results, place a layer of plastic wrap or parchment paper directly on the surface before sealing the container to prevent ice crystals.
Reprocessing: If the ice cream becomes too hard after freezing, let it sit at room temperature for 5-10 minutes, then use the Ninja Creami’s Re-spin function to restore its creamy texture.
Avoid Refreezing Melted Ice Cream: If the ice cream melts completely, it’s best to consume it rather than refreezing, as the texture may become icy.
Tips for Perfect Vanilla Bean Ice Cream
Making the perfect Ninja Creami Vanilla Bean Ice Cream requires a bit of attention to detail, but with these tips, you’ll always end up with a creamy, irresistible dessert.
Consistency Matters
The texture of the ice cream is key to getting it just right. If your ice cream turns out too soft, you can process it a second time on the “Re-spin” setting.
However, if you prefer a firmer consistency, let it sit in the freezer for a few hours after processing.
Keep in mind that using the Ninja Creami’s pre-chilled mixture can also help achieve a smoother texture.
Freezing Tips
To ensure your ice cream freezes evenly, make sure to give the mixture enough time to chill in the freezer before processing.
An ideal chilling time is about 12 to 24 hours. Avoid opening the lid too often, as this can affect the freezing process and the final texture of your ice cream.
Troubleshooting
If you notice that your ice cream is icy or grainy, this could be due to insufficient mixing of the ingredients or not freezing the mixture long enough before processing.
In these cases, a quick Re-spin or freezing the ice cream for a bit longer should do the trick.
Conclusion
Making Ninja Creami Vanilla Bean Ice Cream at home is an easy and fun way to indulge in a delicious, homemade treat.
The rich, natural vanilla flavor combined with the smooth, creamy texture is simply unbeatable.
With the Ninja Creami, you get to enjoy the pleasure of ice cream in no time, with minimal effort and maximum flavor.
Whether you’re serving it on its own, topping off a warm dessert, or using it as the star of a sundae, this homemade vanilla bean ice cream will elevate any occasion.
Plus, you can feel good about making it with fresh, high-quality ingredients.
So, gather your ingredients, get your Ninja Creami ready, and prepare for a mouthwatering experience!
Frequently Asked Questions
1. Can I make this ice cream without the Ninja Creami?
Yes, you can! If you don’t have a Ninja Creami, you can still make this recipe using a traditional ice cream maker.
Simply follow the same steps to prepare the vanilla bean mixture, chill it, and then churn it in your ice cream maker according to the manufacturer’s instructions.
2. How long does Ninja Creami Vanilla Bean Ice Cream last?
When stored in an airtight container in the freezer, this ice cream should stay fresh for up to 1-2 weeks.
However, for the best texture and flavor, we recommend enjoying it within the first week of making it.
3. Can I substitute any ingredients in this recipe?
Yes! If you prefer a dairy-free version, you can substitute the heavy cream and whole milk with coconut cream and almond milk.
For a lower-sugar option, try using a sugar substitute like stevia or erythritol. Keep in mind that these substitutions may slightly alter the texture or flavor of the ice cream.
4. Why is my ice cream too soft after using the Ninja Creami?
If your ice cream is too soft, try placing the pint back into the freezer for a couple of hours to harden.
You can also use the Re-spin function to help achieve a firmer texture if you prefer it right after processing.
5. Can I add other flavors or mix-ins to this ice cream?
Absolutely! Once the base is made, you can customize your Ninja Creami Vanilla Bean Ice Cream with chocolate chips, crushed nuts, caramel swirls, or fruit preserves.
Just mix them in after processing, or swirl them through the ice cream for added flavor.
Ninja Creami Coffee Ice Cream
Equipment
- 1 Ninja Creami Machine
- 1 Mixing Bowl
- 1 Sharp Knife (for cutting vanilla beans)
- 1 Spoon or Spatula (for scraping vanilla seeds)
- 1 measuring cup
- 1 Pint Container (compatible with Ninja Creami)
Ingredients
- 2 cups 480 ml Heavy Cream
- 1 cup 240 ml Whole Milk
- 3/4 cup 150 g Granulated Sugar
- 2 Vanilla Beans
- 1/4 teaspoon Salt
Instructions
- Prepare the Vanilla Bean: Slice open each vanilla bean pod lengthwise with a sharp knife. Using the back of the knife, scrape out the black seeds and set them aside.
- Make the Ice Cream Base: In a mixing bowl, combine heavy cream, whole milk, granulated sugar, vanilla bean seeds, and salt. Stir well until the sugar has completely dissolved and the vanilla seeds are evenly distributed.
- Chill the Mixture: Pour the mixture into the Ninja Creami-compatible pint container, ensuring there is a little room at the top. Cover with the lid and place the container in the freezer. Freeze for 12-24 hours to ensure the mixture is fully set.
- Process the Mixture: Once frozen, remove the pint container from the freezer and insert it into the Ninja Creami machine. Select the “Ice Cream” setting and let the machine process the mixture.
- Check the Consistency: Once the processing is complete, check the texture. If you prefer a firmer consistency, place the pint back into the freezer for a few hours or use the Re-spin setting for a smoother result.
- Serve: Scoop the creamy vanilla bean ice cream into bowls or cones and enjoy! You can also top with your favorite mix-ins or enjoy it as-is.
Notes
- Chilling the Base: It’s important to chill the mixture for at least 12 hours before processing to ensure a smooth, creamy texture.
- Consistency Adjustment: If you want a firmer ice cream, let it freeze for a few hours after processing. For a softer texture, serve immediately.
- Vanilla Bean Substitutes: You can use vanilla extract instead of vanilla beans, but the flavor will be slightly different. Use 2 teaspoons of extract for the equivalent amount of vanilla flavor.
- Add-ins: Feel free to add in chocolate chips, crushed nuts, or swirls of caramel after processing for a fun twist!