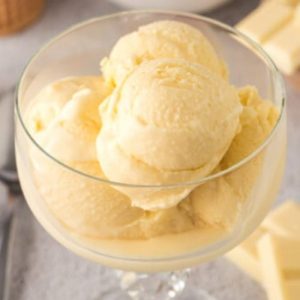
Creamy, rich, and irresistibly smooth, this homemade white chocolate ice cream transforms simple ingredients into a luxurious frozen treat.
Packed with wholesome dairy protein and calcium, it’s both indulgent and nourishing.
Thanks to its satisfying fat content, it delivers a silky texture without artificial thickeners or preservatives.
Easy to prepare with just a few steps and perfect for make-ahead desserts, it’s a delightful recipe you’ll want to keep in your regular rotation.
White Chocolate Ice Cream
Equipment
- 1 Fine mesh strainer
- 1 Medium Saucepan
- 1 Rubber Spatula
- 2 Medium mixing bowls
- 1 Ice Cream Maker
Ingredients
- 8 oz white chocolate finely chopped
- 1 cup whole milk
- ⅔ cup granulated sugar
- 1 pinch salt
- 5 large egg yolks
- 2 cups heavy whipping cream
Instructions
- Prepare Chocolate Base: Place the finely chopped white chocolate into a large, heat-safe mixing bowl. The smaller the pieces, the easier they will melt later. Position a fine mesh strainer securely over the bowl, as this will be used to filter the custard mixture and catch any cooked egg bits for a perfectly smooth texture.
- Warm Milk Mixture: In a medium saucepan, combine the whole milk, granulated sugar, and a small pinch of salt. Place the saucepan over medium heat and stir gently with a rubber spatula or whisk. Allow the mixture to warm gradually until it is hot but not boiling. You want steam rising from the surface without letting it scald, as overheating may affect the milk’s flavor.
- Whisk Egg Yolks: In a separate medium-sized mixing bowl, add the egg yolks. Whisk them vigorously until smooth, pale, and slightly thickened. This process helps the yolks incorporate more evenly into the warm milk mixture and prevents them from scrambling when heated.
- Temper Egg Yolks: To avoid cooking the eggs too quickly, slowly drizzle the hot milk mixture into the egg yolks while whisking constantly. Begin with just a few spoonfuls of hot liquid to gently raise the yolks’ temperature, then gradually add the rest in a thin stream. Continuous whisking is essential to prevent curdling.
- Cook Custard Base: After tempering, pour the egg yolk mixture back into the saucepan. Set the pan over medium heat once more and stir continuously with a heatproof spatula, making sure to scrape along the bottom and sides. Cook until the custard thickens enough to coat the back of the spatula; if you draw a line across it with your finger, the line should remain clear. Do not allow the mixture to boil, as this could cause the eggs to separate.
- Strain and Melt Chocolate: Once the custard reaches the right thickness, carefully pour it through the fine mesh strainer over the chopped white chocolate. Use the spatula to gently press the mixture through. Immediately stir the hot custard and chocolate together until the chocolate melts completely, creating a silky and smooth blend without lumps.
- Incorporate Cream and Cool: Pour the heavy whipping cream into the chocolate mixture and stir until fully combined. For faster cooling, place the bowl over an ice bath (a larger bowl filled with ice and water) and stir frequently until the mixture reaches room temperature. This prevents bacteria growth and prepares the custard for chilling.
- Chill Mixture Thoroughly: Cover the bowl with plastic wrap or a lid and refrigerate for at least 4 hours, preferably overnight. The longer it chills, the better the flavors will develop, and the ice cream will churn more efficiently in the machine. A well-chilled base is key to creamy texture.
- Churn Ice Cream: Once fully chilled, pour the custard into your ice cream maker. Follow the manufacturer’s instructions for churning. The mixture should gradually thicken and transform into a soft, creamy ice cream consistency within 20–25 minutes, depending on your machine.
- Freeze Until Firm: Transfer the churned ice cream into a clean, airtight container. Smooth the top with a spatula and press parchment paper or plastic wrap directly onto the surface to prevent ice crystals from forming. Seal the container with a lid and freeze for at least 4 hours, or until firm enough to scoop.
- Serve and Enjoy: Scoop generous portions of the creamy white chocolate ice cream into bowls, cones, or dessert cups. Enjoy as is, or garnish with fresh berries, chocolate shavings, or a drizzle of raspberry sauce for a truly indulgent treat.
Notes
- Use finely chopped white chocolate to ensure quick melting and a smooth texture.
- Avoid boiling the custard mixture; slow heating gives the creamiest consistency.
- Chill the base thoroughly before churning for the best results.
- Always strain the custard to remove any cooked egg bits.
- For extra flavor, use high-quality white chocolate or flavored varieties (vanilla, caramel).
- Homemade ice cream freezes harder than store-bought—allow it to sit at room temperature for 5 minutes before scooping.
- Keep the container airtight and cover the surface to prevent ice crystals.
- Pair this ice cream with tart fruits or dark chocolate for balance.
- Fresh dairy is key; avoid using low-fat cream or substitutes for the best texture.
- Patience is important—rushing cooling or churning leads to grainy ice cream.
Chef’s Secrets for Perfect Texture
The secret to achieving velvety-smooth ice cream lies in patience and attention to temperature control.
When warming the custard, stir constantly to prevent scorching, and never let it boil.
Tempering the egg yolks properly ensures they emulsify without curdling, which keeps the base silky.
Using heavy cream instead of light substitutes adds the fat needed for that luscious mouthfeel.
Straining the mixture is a small step that makes a big difference, ensuring no lumps interfere with the finished texture.
Finally, chilling the base overnight gives the flavors time to marry and improves the churn, producing a creamier scoop every time.
Serving Suggestions and Pairing Ideas
This white chocolate ice cream shines on its own but becomes even more exciting with creative pairings.
A drizzle of raspberry or passion fruit sauce provides a tart contrast to its sweetness, while fresh strawberries or blueberries add a refreshing bite.
For an indulgent twist, sprinkle on toasted coconut, caramel drizzle, or shaved dark chocolate.
It also makes a wonderful topping for warm desserts like brownies, apple crumble, or waffles, creating a hot-and-cold contrast that guests will love.
For a more elegant serving, scoop it into a dessert glass and garnish with mint leaves or edible flowers.
Storage Tips and Freezer Guidelines
Homemade white chocolate ice cream is best enjoyed within two weeks of churning.
Store it in an airtight, freezer-safe container to maintain freshness.
To prevent ice crystals from forming, press parchment paper or plastic wrap directly onto the surface before sealing with the lid.
Place the container in the coldest part of the freezer, away from the door, where temperatures are most consistent.
Since homemade ice cream contains no stabilizers, it will freeze harder than commercial brands.
Let it sit at room temperature for 5–10 minutes before scooping to achieve that creamy, easy-to-serve texture.
Frequently Asked Questions
1. Can I make this without an ice cream maker?
Yes! After chilling the custard, pour it into a shallow dish and freeze. Stir every 30–45 minutes for about 3 hours to break up ice crystals until smooth.
The texture won’t be as creamy as machine-churned, but it still makes a tasty treat.
2. What type of white chocolate works best?
Any good-quality white chocolate will do. Baking squares or couverture chocolate melt more smoothly than chips, which often contain stabilizers.
Choose a brand with cocoa butter listed high in the ingredients for the richest flavor.
3. Can I substitute the heavy cream with milk?
Heavy cream is essential for creaminess. If you replace it with milk, the ice cream will be less rich and more icy.
However, you can experiment with half-and-half or coconut cream for a slightly lighter but still creamy texture.
4. How do I prevent the custard from curdling?
The key is slow heating and constant stirring. Always temper the egg yolks by gradually adding hot milk while whisking.
Avoid boiling the custard—once it coats the back of a spoon, remove it from heat immediately.
5. Can I add mix-ins like nuts or cookies?
Absolutely! Fold in chopped nuts, crushed cookies, or swirls of caramel once the ice cream has finished churning.
Be sure to add them at the end to avoid clogging the machine and to keep the base smooth during the freezing process.