This vegan oat bread is a wholesome, quick-baking loaf packed with fiber-rich oats and plant-based protein from flaxseeds.
Naturally egg- and dairy-free, it’s light, slightly sweet, and loaded with heart-healthy fats from olive oil.
Perfect for breakfast, sandwiches, or meal prep, this easy-to-make bread combines nourishing ingredients with fast prep and satisfying results for everyday cooking.
Vegan Oat Bread
Equipment
- 1 Small Saucepan
- 1 Small bowl
- 1 large mixing bowl
- Wooden spoon
- 2 loaf pans (8×4 inches recommended)
- Measuring Cups and Spoons
- Oven
Ingredients
- 1 cup old-fashioned oats
- 2 cups warm water divided
- 1/3 cup extra virgin olive oil
- 1/3 cup agave nectar
- 1 teaspoon sea salt
- 1 tablespoon ground flaxseeds
- 1 tablespoon warm water
- 2 tablespoons instant yeast
- 4 –5 cups all-purpose flour start with 4.5 cups for dough
Instructions
- Prepare the Oat Mixture: In a small saucepan, bring 1 cup of water to a gentle boil over medium heat. Once the water is bubbling lightly, add 1 cup of old-fashioned oats, 1/3 cup of extra virgin olive oil, 1/3 cup agave nectar, and 1 teaspoon of sea salt. Stir thoroughly to combine, allowing the oats to absorb some of the liquid. Once everything is well mixed and lightly bubbling, remove the saucepan from the heat and let the mixture cool for about 5 minutes. The oats should be warm but not hot, ensuring they won’t kill the yeast in the next step.
- Make the Flaxseed Paste: In a small bowl, combine 1 tablespoon of ground flaxseeds with 1 tablespoon of warm water. Stir the mixture well until it forms a thick, gel-like paste. This flaxseed paste will act as a binding agent, replacing eggs in the bread and giving it structure and moisture. Set aside for now, letting it thicken slightly.
- Activate the Yeast: In a large mixing bowl, pour 1 cup of warm water (use the remaining cup) and sprinkle in 2 tablespoons of instant yeast. Whisk gently until the yeast is fully dissolved. Allow it to sit for 5 minutes so it can begin fermenting. You should see small bubbles forming on the surface, which means the yeast is active and ready to help your bread rise.
- Combine Wet Ingredients with Yeast: Once the yeast is bubbly, pour in the slightly cooled oat mixture from Step 1. Stir gently to combine, ensuring that the oats, oil, and agave nectar are evenly distributed throughout the yeast mixture. This mixture forms the flavorful, moist base of your bread.
- Incorporate Flaxseed Paste and Flour: Add the prepared flaxseed paste from Step 2 into the large bowl. Mix thoroughly with a wooden spoon so that the flax paste is fully incorporated. Begin adding 2 cups of all-purpose flour, mixing until you have a sticky, cohesive dough. Gradually add the remaining flour (start with 2–3 cups) until a thick, slightly elastic dough forms. The dough should not be overly dry; it should hold together and pull away from the sides of the bowl but remain slightly tacky to the touch.
- Prepare the Loaf Pans: Grease two loaf pans generously with a thin layer of oil or vegan butter to prevent sticking. Use pans about 8×4 inches for best results. Once the pans are ready, divide the dough evenly between the two pans, pressing it lightly so that it spreads to the edges but maintains some height. Smooth the tops gently with a spatula or your fingers.
- Allow the Dough to Rise: Cover the pans loosely with a clean kitchen towel or plastic wrap. Place the pans in a warm, draft-free spot in your kitchen and allow the dough to rise for 30 to 45 minutes, or until it has doubled in size. This step is crucial for achieving a soft, airy texture. Avoid rushing this process; a slow rise can improve flavor and bread structure.
- Preheat the Oven: While the dough is rising, preheat your oven to 375°F (190°C). Ensure the oven is fully heated before baking to allow even cooking and a golden-brown crust.
- Bake the Bread: Once the dough has fully risen, place the loaf pans in the preheated oven on the middle rack. Bake for 40 to 45 minutes, or until the tops of the loaves are golden brown and firm to the touch. You can test doneness by gently tapping the top of a loaf—it should sound hollow.
- Cool and Slice: Remove the bread from the oven and allow it to cool in the pans for about 10 minutes. Then carefully transfer the loaves to a wire rack and let them cool completely, at least 30 minutes, before slicing. Cooling ensures the bread sets properly and prevents it from becoming gummy. Slice the bread with a sharp serrated knife, and enjoy fresh, soft, and flavorful vegan oat bread.
- Optional Serving Tip: For extra flavor, lightly toast slices before serving, or spread with nut butter, avocado, or your favorite vegan jam. This bread also stores well, making it perfect for meal prep or quick breakfasts throughout the week.
Notes
- This vegan oat bread is naturally egg- and dairy-free, making it suitable for plant-based diets.
- Use warm, not hot water for activating the yeast; too hot can kill it, too cold slows rising.
- Adjust the flour slightly depending on humidity; the dough should be thick but slightly tacky.
- For a slightly sweeter loaf, you can add an extra teaspoon of agave or maple syrup.
- Slicing the bread before it cools completely can cause it to become gummy, so patience is key.
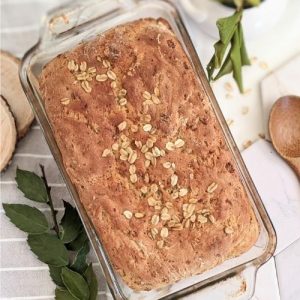
- Optional: Sprinkle additional oats on top before baking for a rustic, textured finish.
Chef’s Secrets For Perfect Bread
The secret to an airy, flavorful vegan oat bread lies in balancing moisture and structure.
Using oats and flaxseed paste adds both fiber and natural binding without eggs.
Make sure the oat mixture is warm but not hot when combined with yeast to avoid inhibiting fermentation.
Allowing the dough to rise in a draft-free, slightly warm environment helps it develop a tender, soft crumb.
Using a mix of 4–5 cups flour allows you to achieve a dough that is easy to shape but still light.
Finally, don’t rush the cooling process; letting the loaves cool fully ensures a perfect slice every time.
Creative Serving Suggestions And Pairings
This vegan oat bread is versatile and pairs beautifully with sweet or savory toppings.
Toast slices lightly and spread with almond butter and banana for a nourishing breakfast.
For lunch, use it for sandwiches with hummus, avocado, and fresh vegetables, or serve alongside a hearty soup or salad.
The mildly sweet, nutty flavor also makes it excellent for morning toasts with jam, vegan cream cheese, or a drizzle of maple syrup.
For entertaining, cut into cubes for a vegan breadboard with dips or spreads.
Smart Storage Tips And Techniques
Vegan oat bread stores well at room temperature for 2–3 days when kept in an airtight container or bread bag.
For longer storage, slice the loaf and freeze individual slices in a freezer-safe bag for up to 1 month.
When ready to eat, toast directly from frozen for maximum freshness.
Avoid refrigerating the bread, as this can dry it out and make it lose its soft texture.
Using parchment paper to separate slices when freezing can prevent them from sticking together.
Frequently Asked Questions
1. Can I use rolled oats instead of old-fashioned oats?
Yes! Rolled oats work well in this recipe. Quick oats may make the bread slightly denser, while steel-cut oats are too coarse and may not soften enough during baking.
2. Can I substitute the agave nectar with another sweetener?
Absolutely! Maple syrup, coconut sugar syrup, or even a mild brown sugar dissolved in water works well. Adjust sweetness to your taste preference.
3. How do I know if the yeast is active?
After mixing the yeast with warm water, it should foam or bubble within 5 minutes.
This indicates it is active and ready to use. If no bubbles appear, the yeast may be expired or the water temperature was incorrect.
4. Can I make this bread gluten-free?
Yes, but you’ll need a gluten-free all-purpose flour blend and possibly a binding agent like xanthan gum to maintain structure.
The texture will be slightly different, but it will still taste delicious.
5. Can I add seeds or nuts to this bread?
Definitely! Chopped walnuts, pumpkin seeds, sunflower seeds, or even chia seeds can be folded into the dough before rising.
This adds extra texture, flavor, and nutritional benefits.