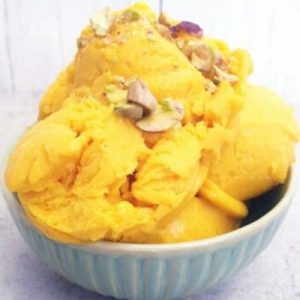
This creamy, tropical No-Churn Mango Coconut Ice Cream is a delightfully simple vegan treat that requires only three pantry-friendly ingredients.
Rich in plant-based protein and healthy fats from coconut, it’s naturally dairy-free, high in flavor, and lightly sweetened.
Perfect for quick desserts or make-ahead treats, it’s a fuss-free option that satisfies cravings while offering a nourishing, fiber-rich boost for your everyday indulgences.
Vegan Coconut Mango Ice Cream
Equipment
- Stand Mixer or Electric Whisk
- Measuring Scales
- Silicone Spatula
- Small Mixing Bowl
- Medium Lidded Container (Pyrex or similar)
Ingredients
- 400 ml full-fat coconut milk chilled
- 320 g condensed coconut milk chilled
- 600 g mango pulp fresh or tinned
Instructions
- Chill Ingredients Thoroughly: Before beginning, ensure both the full-fat coconut milk and condensed coconut milk have been completely chilled in the refrigerator for several hours or overnight. Cold ingredients are crucial for achieving a light, airy, and creamy texture in your ice cream without needing an ice cream machine. Chilling also helps the coconut solids whip up beautifully.
- Separate Coconut Solids: Open the chilled coconut milk and pour it into a small bowl. You will notice it naturally separates into a thick, white solid and a clear liquid. Carefully scoop out the thick, creamy solids and transfer them to a large mixing bowl or the bowl of a stand mixer. The clear liquid can be saved for smoothies, cooking, or discarded.
- Whip Coconut Cream Until Fluffy: Using a stand mixer or electric whisk, beat the coconut solids for 2 to 3 minutes on medium-high speed. The mixture should lighten in color and become fluffy, airy, and smooth. This whipped coconut will form the creamy base of your ice cream. Once whipped, transfer it to a separate bowl and set aside temporarily.
- Prepare Condensed Coconut Milk: Without cleaning the mixing bowl, pour the chilled condensed coconut milk into the bowl. Using the whisk attachment or electric mixer, whip the condensed milk for 3 to 4 minutes. The mixture should double in volume, lighten in color, and become slightly frothy, forming a sweet, airy base that blends beautifully with the coconut cream.
- Combine Whipped Coconut Cream: Gently fold the previously whipped coconut cream into the sweetened condensed coconut milk. Whisk or fold together for about 1 minute, ensuring an even, light, and smooth mixture without deflating the air you’ve incorporated. This step is important for creating a creamy, melt-in-your-mouth ice cream texture.
- Add Mango Pulp Gradually – First Portion: Take 200 g of mango pulp and add it to the mixture. Whisk gently for 1 minute until it is fully incorporated. The ice cream base should start showing a pale yellow-orange color, and the mango flavor will begin to infuse the creamy mixture.
- Incorporate Mango Pulp – Second Portion: Add another 200 g of mango pulp and continue whisking for an additional 1 minute. This gradual addition helps maintain a smooth texture and ensures the mango is evenly distributed throughout the ice cream base.
- Incorporate Mango Pulp – Final Portion: Add the remaining 200 g of mango pulp. Whisk carefully for 1 to 2 minutes until the mixture becomes a uniform, vibrant, golden-orange color and has a light, fluffy consistency. Taste and adjust if necessary; the mango flavor should be bright and prominent.
- Transfer Into Freezer-Safe Container: Using a silicone spatula, scrape the ice cream mixture into a medium-sized lidded container suitable for freezing. Smooth the top gently to create an even surface, which will help it freeze evenly.
- Freeze Until Firm: Place the container in the freezer and allow the ice cream to set for a minimum of 6 hours, or preferably overnight. Avoid opening the lid frequently, as this can cause ice crystals and affect the creamy texture.
- Serve and Enjoy: After freezing, remove the ice cream from the freezer about 5 to 10 minutes before serving to allow it to soften slightly for easier scooping. Serve in bowls or cones, optionally garnished with fresh mango chunks, shredded coconut, or a drizzle of mango puree for extra flair.
Notes
- Use full-fat coconut milk and condensed coconut milk that are well-chilled for the best texture.
- Whipping the coconut solids separately creates a fluffy, creamy base that mimics traditional ice cream without an ice cream machine.
- Gradually adding mango pulp ensures a smooth, evenly flavored ice cream with a vibrant tropical color.
- This recipe requires no specialized equipment beyond a whisk or stand mixer, making it perfect for beginners.
- Allowing the ice cream to freeze completely before serving ensures clean scoops and a satisfying, creamy texture.
- You can adjust the sweetness by using unsweetened or lightly sweetened mango pulp if desired.
Chef’s Secrets For Creamiest Results
For the silkiest texture, always chill your coconut ingredients thoroughly before whipping.
The separation of solids and liquids is key—discarding the watery part or saving it for another use prevents a grainy texture.
Whipping the solids first ensures air is incorporated, creating a fluffy base.
Folding gently when combining with condensed coconut milk avoids deflating the mixture.
Finally, adding mango pulp gradually and whisking carefully preserves both creaminess and vibrant flavor.
Creative Serving Suggestions And Ideas
Serve your mango coconut ice cream straight from the freezer with a drizzle of fresh mango puree or a sprinkle of toasted coconut flakes for texture.
It pairs beautifully with tropical fruits like pineapple, passionfruit, or kiwi, and can be layered in dessert cups with granola for a healthy parfait.
For an indulgent twist, top with vegan chocolate shavings, crushed nuts, or a dollop of coconut yogurt.
This dessert is also perfect for summer parties and casual family gatherings.
Smart Storage Tips For Best Quality
Store your ice cream in an airtight container to prevent freezer burn and maintain flavor.
Press a layer of parchment paper directly on the surface before sealing to minimize ice crystal formation.
Keep it in the coldest part of your freezer and avoid frequent opening.
It is best enjoyed within 2–3 weeks for optimal texture and taste.
To soften slightly before serving, leave it at room temperature for 5–10 minutes or scoop using a warm spoon.
Frequently Asked Questions
1. Can I use light coconut milk instead of full-fat?
Light coconut milk contains less fat, which may result in a less creamy texture.
For best results, always use full-fat coconut milk to achieve a rich, airy ice cream.
2. Do I need an ice cream machine?
No, this is a true no-churn recipe. Whipping the coconut solids and folding in the condensed milk creates the same creamy, fluffy texture without specialized equipment.
3. Can I use fresh mangoes instead of tinned pulp?
Yes, ripe mangoes can be blended into a smooth pulp. Measure about 600 g of mango flesh to replace the tinned version.
Adding fresh mango may slightly increase natural sweetness and flavor intensity.
4. How long can I store this ice cream?
Properly stored in an airtight container, the ice cream can last 2–3 weeks in the freezer. For the best texture, avoid repeated thawing and refreezing.
5. Can I make this recipe ahead of time for a party?
Absolutely! This recipe is ideal for make-ahead dessert prep.
Prepare the ice cream up to a day or two in advance and freeze until ready to serve, ensuring a stress-free, tropical dessert for your guests.