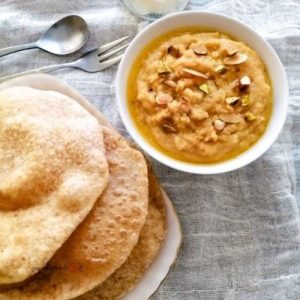
Halwa Puri is a comforting and indulgent breakfast classic that blends sweet, nutty semolina halwa with golden, fluffy puris.
Packed with protein from milk and nuts, and enriched with heart-healthy fats from ghee and butter, this dish is both satisfying and energizing.
Quick to prepare and perfect for brunch or weekend breakfasts, it’s a nourishing treat that’s simple enough for everyday cooking.
Traditional Halwa Puri
Equipment
- 1 Mixing Bowl
- 1 Cooking pan
- 1 Frying pan or wok
- 1 slotted spoon
- 1 Wooden spoon
Ingredients
For the Halwa:
- 1 cup coarse semolina
- ½ cup sugar
- 2 ⅓ sticks salted butter
- 2 ½ cups whole milk
- ¼ cup mixed chopped nuts almonds, pistachios, optional
- 3 –4 green cardamom pods crushed (optional)
- 1 –2 tbsp ghee optional
For the Puri:
- 1 cup Atta flour chapati flour
- ½ cup + 1 tbsp water
- ½ tsp oil + extra for greasing
- Oil for frying
Instructions
- Toast the Semolina: Place the coarse semolina in a dry, heavy-bottomed pan over medium-high heat. Stir continuously using a wooden spoon to prevent burning. Toast the semolina until it develops a light golden-brown hue and releases a warm, nutty aroma. This process ensures the halwa will have a rich flavor and prevents it from becoming grainy when milk is added.
- Incorporate the Butter: Once the semolina is evenly toasted, reduce the heat slightly and add the salted butter. Stir thoroughly so that the butter melts and coats every grain of semolina. You will notice the mixture becomes glossy and slightly sticky—this is normal. If you are using green cardamom for flavor, add the seeds now, crushing them lightly to release their fragrant aroma.
- Add the Sugar: Sprinkle the sugar over the buttered semolina and continue stirring. Cook until the sugar melts completely and is absorbed by the semolina. Stir consistently to avoid clumping, ensuring a smooth and slightly glossy mixture. This step creates the characteristic sweetness and adds depth to the halwa’s texture.
- Mix in the Nuts: Add the chopped nuts—such as almonds and pistachios—and fold them into the semolina mixture. The nuts provide crunch, texture, and natural oils that enhance the richness of the halwa. Keep stirring to ensure even distribution throughout the semolina.
- Pour in the Milk Gradually: Slowly add the whole milk to the pan in small portions while continuously stirring. The mixture will initially become very wet and loose, which is normal. Stir gently but consistently to prevent lumps. Continue cooking until the semolina absorbs the milk entirely, resulting in a thick, creamy halwa. Adjust the consistency by adding a little more milk if desired for a softer texture.
- Finish with Ghee (Optional): While the halwa is still piping hot, stir in a tablespoon or two of ghee if desired. This step enhances the aroma, adds a glossy finish, and gives the halwa a luxurious, melt-in-your-mouth quality. Taste and adjust sugar or nuts as needed. Set aside and keep warm while preparing the puris.
- Prepare the Puri Dough: In a large mixing bowl, place the atta flour and create a small well in the center. Pour in the water and ½ teaspoon oil. Mix with your hand, gradually incorporating the flour into the liquid until a smooth, pliable dough forms. Knead gently for about 5–7 minutes until the dough is soft, elastic, and not sticky. Shape the dough into a ball, lightly coat with oil, and cover with a clean tea towel. Let it rest for 20–30 minutes to allow gluten development for puffier puris.
- Divide and Shape the Dough: After resting, divide the dough into six equal portions. Roll each portion into a smooth ball. Using a rolling pin, flatten each ball into a circular shape approximately 12–15 cm in diameter and about 2 mm thick. Lightly dust the surface with flour to prevent sticking, but use sparingly to avoid making the oil cloudy during frying.
- Heat the Oil for Frying: In a deep frying pan or wok, pour enough oil to submerge the puris partially. Heat the oil over medium-high heat. Test the oil by dropping a small piece of dough into it—if it rises and bubbles immediately, the oil is ready for frying. Properly heated oil ensures the puris puff evenly and absorb minimal grease.
- Fry the Puris to Golden Perfection: Carefully slide one rolled puri into the hot oil. Using a slotted spoon or spatula, gently press the puri down so that the uncooked side touches the oil and encourages puffing. Fry until the puri turns a light golden color on both sides. Remove with a slotted spoon and drain on paper towels. Repeat with remaining dough, maintaining consistent oil temperature for uniform cooking.
- Serve Warm and Enjoy: Arrange the golden puris on a serving plate alongside the freshly made halwa. Serve immediately while both components are warm. Halwa Puri pairs beautifully with yogurt, pickles, or fresh fruits for a complete, satisfying breakfast or brunch experience.
Notes
- Use coarse semolina for a rich, textured halwa; fine semolina may result in a mushy consistency.
- Butter and ghee enhance flavor and creaminess—adjust according to your preference for richness.
- Toast semolina slowly and evenly to avoid burning; this step is key for nutty aroma.
- Keep puri dough soft but not sticky; resting allows gluten development, resulting in puffier puris.
- Roll puris thinly (about 2 mm) for optimal puffing; thicker puris may remain dense.
- Use minimal flour while rolling to prevent oil from becoming cloudy during frying.
- Cardamom adds traditional aroma but can be skipped if unavailable.
- Nuts like almonds and pistachios add crunch and healthy fats; you may also use cashews.
Chef’s Secrets: Tips For Perfect Texture
Achieving the ideal Halwa Puri requires attention to a few small details.
Toasting the semolina until it emits a nutty aroma is essential for flavor depth.
Incorporating butter in stages ensures smoothness and prevents lumps.
For the puris, resting the dough is critical: it allows gluten to relax, making them puff evenly while frying.
Use moderate-high heat for oil to avoid over-saturated, greasy puris, and press gently to encourage puffing.
Finally, folding in ghee at the end adds a silky texture and enhances aroma, giving the halwa a restaurant-quality finish.
Serving Suggestions: Delicious Pairing Ideas
Halwa Puri is best served hot and fresh from the pan.
Pair the golden puris with steaming, creamy halwa for the classic combination.
For added variety, serve with a side of plain yogurt or raita, which balances sweetness with creaminess.
Pickled vegetables or mango chutney add a tangy contrast and make the meal feel festive.
For a brunch spread, include fresh fruits like berries or banana slices to complement the rich, buttery flavors.
This dish also works well for a celebratory breakfast or a weekend family brunch.
Storage Tips: Keep Halwa Puri Fresh
Halwa can be stored in an airtight container in the refrigerator for up to 3 days.
Reheat gently on low heat or in a microwave, stirring occasionally, to retain creaminess.
Puris are best consumed immediately, as they tend to lose their crispness when stored.
If needed, you can freeze cooked puris separated by parchment paper and reheat in a hot oven for a few minutes until they regain crispiness.
Avoid refrigerating fried puris, as moisture will make them soggy.
Frequently Asked Questions
1. Can I make this recipe ahead of time?
Yes, you can prepare the halwa in advance and refrigerate it for up to 3 days.
However, puris are best made fresh just before serving to maintain their light, puffed texture.
2. What nuts work best in Halwa?
Almonds and pistachios are traditional choices, adding crunch and flavor. Cashews or walnuts can also be used.
Chop them finely for even distribution throughout the halwa.
3. Can I make this recipe dairy-free?
You can substitute butter with plant-based margarine and use almond or oat milk instead of whole milk.
The texture may vary slightly, but the flavors remain rich and enjoyable.
4. How do I ensure puris puff properly?
Use soft, well-rested dough and roll thinly. Fry in moderate-high heated oil and gently press the edges to encourage puffing.
Avoid overcrowding the pan to maintain even temperature.
5. Can I adjust sweetness or richness?
Absolutely! Reduce sugar if you prefer a milder sweetness, and adjust butter or ghee quantities to control richness.
Adding cardamom or a pinch of saffron can enhance flavor without extra sugar.