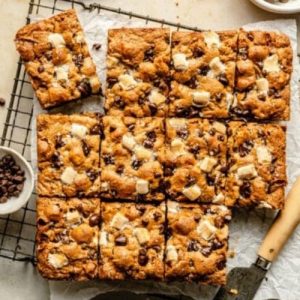
These S’mores Cookie Bars are a wholesome twist on a classic campfire treat, combining crunchy graham crackers, gooey marshmallows, and rich dark chocolate in a plant-based, fiber-packed bar.
Made with almond and tapioca flours and naturally sweetened with maple syrup and coconut sugar, they’re high in good fats, protein, and low in refined carbs.
Perfect for quick snacks, meal prep, or an everyday sweet treat without the guilt.
S’mores Cookie Bars
Equipment
- 9×9-inch square baking pan
- Parchment paper (enough to line pan with overhang)
- Large mixing bowl
- Rubber spatula
- whisk
- Measuring Cups and Spoons
- Toothpick (for testing doneness)
Ingredients
Bottom Layer:
- 12 graham cracker squares
Cookie Layer:
- 2 tsp pure vanilla extract
- 1 large egg room temperature
- ½ cup coconut sugar
- ¼ cup coconut oil or avocado oil
- ¼ cup maple syrup
- ½ tsp ground cinnamon
- 1 ½ cups almond flour
- ¾ cup tapioca flour
- ½ tsp baking soda
- ¼ tsp kosher salt
- 1 cup dairy-free dark chocolate chips or regular chocolate chips
- 1 cup mini marshmallows
- 1 cup crushed graham crackers about 8 sheets
- Maldon salt for topping (optional)
Instructions
- Prepare the Pan: Preheat your oven to 350°F (175°C). Line a 9×9-inch baking pan with parchment paper, leaving extra overhang on the sides for easy removal of the bars later.
- Create the Base: Arrange graham crackers in a single layer to cover the bottom of the pan, breaking pieces as needed to fit snugly. Set aside.
- Mix Wet Ingredients: In a large bowl, whisk together the vanilla extract, egg, coconut sugar, coconut oil, and maple syrup until smooth and fully combined.
- Incorporate Dry Ingredients: Add the almond flour, tapioca flour, cinnamon, baking soda, and kosher salt to the wet mixture. Fold gently with a spatula until the dough is uniform.
- Add Mix-Ins: Carefully fold in the chocolate chips, mini marshmallows, and crushed graham crackers, making sure they’re evenly distributed.
- Assemble the Bars: Spread the cookie dough evenly over the graham cracker base, gently pressing it flat. For visual appeal, press a few extra marshmallows and chocolate chips on top.
- Bake: Place in the preheated oven and bake for 25–30 minutes, or until the top is golden brown and a toothpick inserted in the center comes out clean. Cover with foil if the edges brown faster than the center.
- Cool Completely: Let the bars cool in the pan for about 45 minutes. This allows the layers to set properly.
- Finish and Serve: Lift the bars out of the pan using the parchment overhang, cut into 12 squares, and sprinkle with Maldon salt if desired.
Notes
- For a perfectly even base, gently press the graham crackers into the pan without crushing them too much.
- Allow the bars to cool completely before slicing to avoid crumbling.
- Coconut sugar and maple syrup provide natural sweetness and a chewy texture, but regular brown sugar can be substituted if needed.
- Mini marshmallows on top create a visually appealing golden finish.
- You can mix regular chocolate chips with mini chips for added texture.
- This recipe is naturally gluten-free and can be made dairy-free by using plant-based chocolate chips.
Chef’s Secrets To Perfect Bars
Achieving the ideal S’mores Cookie Bars is all about balance.
Using almond and tapioca flours ensures a tender yet chewy texture without over-relying on refined flours.
Pressing the cookie dough evenly over the graham cracker layer helps each bite maintain structure.
For a more visually striking bar, add extra mini chocolate chips or marshmallows on top before baking.
Finally, cooling completely before slicing allows flavors to meld and prevents the bars from falling apart.
Serving Suggestions For Everyday Enjoyment
These bars are versatile and perfect for multiple occasions.
Serve warm for a gooey, melty experience or at room temperature for a firmer, easy-to-handle snack.
Pair with a glass of plant-based milk, a hot coffee, or an afternoon tea for a cozy treat.
They’re also ideal for lunchboxes, picnic baskets, or as a simple dessert after dinner.
Cutting them into smaller squares works great for portion-controlled snacking.
Storage Tips For Freshness
To maintain optimal texture, store the bars in an airtight container at room temperature for up to 3 days.
For longer storage, refrigerate for up to a week; just bring them to room temperature before serving to restore softness.
These bars also freeze beautifully—wrap individually in parchment and store in a freezer-safe container for up to 2 months.
Thaw overnight in the fridge for best results.
Frequently Asked Questions
1. Can I make this recipe vegan?
Yes! Swap the egg for a flax egg (1 tbsp flaxseed meal + 3 tbsp water) and use dairy-free chocolate chips to make the recipe fully vegan while retaining texture and flavor.
2. Can I use different flours?
Almond and tapioca flours provide the perfect balance of chewiness and structure.
You can experiment with oat flour or a gluten-free all-purpose blend, but you may need to adjust the liquid slightly.
3. Can I use regular sugar instead of coconut sugar?
Yes, brown sugar can replace coconut sugar one-to-one. Expect slightly more moisture and a deeper caramel flavor.
Maple syrup can remain the same for sweetness and chewiness.
4. How do I prevent marshmallows from burning?
Add marshmallows on top towards the last 5 minutes of baking, or cover the bars loosely with foil if the tops brown faster than the center.
5. Can I make these bars ahead of time?
Absolutely. These bars are great for meal prep and can be made a day or two in advance.
Store in an airtight container at room temperature or freeze for longer storage.