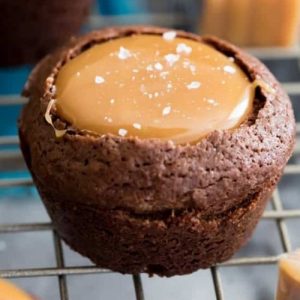
Indulge in these irresistible Salted Caramel Brownie Bites, a perfect blend of fudgy chocolate and creamy caramel.
Packed with protein from eggs and rich cocoa, plus good fats from butter and chocolate, they satisfy sweet cravings without overindulgence.
Quick and easy to prepare, these bite-sized treats are perfect for everyday snacking, dessert, or even meal prep for a decadent yet manageable treat.
Salted Caramel Brownie Bites
Equipment
- 1 × 24-cup mini muffin tin
- 1 × microwave-safe mixing bowl
- 1 × small saucepan
- 1 × Whisk
- 1 × spoon
- Baking spray or butter for greasing
Ingredients
Brownie Bites
- 12 tbsp unsalted butter cut into pieces
- ½ cup semisweet chocolate chips 100 g
- ½ cup unsweetened cocoa powder 50 g
- ½ tsp instant coffee powder
- 1 cup light brown sugar packed (200 g)
- ½ cup granulated sugar 100 g
- 2 large eggs
- 1 large egg yolk
- 1 tsp vanilla extract
- 1 cup all-purpose flour 140 g
- 2 tbsp all-purpose flour
- ½ tsp baking powder
- ½ tsp salt
Caramel Filling
- 35 unwrapped caramels
- ½ cup heavy cream 115 ml
- Fine sea salt for sprinkling
Instructions
- Preheat Oven and Prepare Pan: Begin by preheating your oven to 350°F (175°C) to ensure even baking. While the oven warms, prepare a 24-cup mini muffin tin by generously spraying it with baking spray that contains flour. This step prevents the brownie bites from sticking. If you don’t have baking spray, lightly grease each muffin cup with butter and dust with flour, then tap out any excess.
- Melt Chocolate and Butter: Place 12 tablespoons of unsalted butter and ½ cup of semisweet chocolate chips into a large, microwave-safe bowl. Microwave on high for 30 seconds, then stir thoroughly. Continue microwaving in 15-second increments, stirring after each session, until the butter and chocolate are fully melted and smooth. This method ensures a glossy, lump-free chocolate base.
- Add Cocoa and Coffee: Once the chocolate and butter mixture is smooth, stir in ½ cup of unsweetened cocoa powder and ½ teaspoon of instant coffee. The cocoa deepens the chocolate flavor, while the coffee intensifies the richness without adding a noticeable coffee taste. Mix until fully incorporated and uniform in color.
- Sweeten the Batter: Add 1 cup of packed light brown sugar and ½ cup of granulated sugar to the chocolate mixture. These two sugars balance sweetness and moisture—brown sugar gives a subtle molasses flavor and keeps the brownies chewy, while granulated sugar enhances structure. Stir or whisk until the sugars are completely dissolved.
- Incorporate Eggs and Vanilla: Crack in 2 large eggs and 1 large egg yolk, then add 1 teaspoon of pure vanilla extract. Beat the mixture vigorously until smooth and slightly thickened. This step ensures the eggs are fully blended, creating a fudgy texture while adding protein.
- Combine Dry Ingredients Separately: In a medium bowl, whisk together 1 cup plus 2 tablespoons of all-purpose flour, ½ teaspoon of baking powder, and ½ teaspoon of salt. This ensures the baking powder is evenly distributed, preventing uneven rising, and the salt balances the sweetness.
- Mix Wet and Dry Ingredients: Gradually add the dry flour mixture to the chocolate-egg mixture. Use a spatula or wooden spoon to gently fold everything together until just combined. Be careful not to overmix, as this can make the brownies tough. Stop once there are no visible streaks of flour.
- Portion Batter into Muffin Tin: Spoon approximately 1 ½ tablespoons of brownie batter into each prepared mini muffin cup. Spread slightly if needed, leaving a small well in the center for the caramel later. This ensures uniform bite-sized brownies that cook evenly.
- Bake the Brownie Bites: Place the muffin tin in the preheated oven and bake for 18 minutes. To check doneness, insert a toothpick into the center of one brownie bite; it should come out with a few fudgy crumbs, but not wet batter. Overbaking will result in dry brownies, so keep a close eye during the last few minutes.
- Create Wells for Caramel: Immediately after removing the brownies from the oven, use the back of a teaspoon or small spoon to gently press down the center of each brownie bite, creating a well. Be careful not to press too hard; you just want a small indentation for the caramel. Let the brownies cool slightly while preparing the filling.
- Prepare Caramel Filling: In a small saucepan over medium-low heat, combine 35 unwrapped caramels with ½ cup of heavy cream. Stir frequently, ensuring the mixture doesn’t stick or burn, until the caramels are fully melted and the cream is incorporated into a smooth, creamy caramel sauce. Remove from heat and allow to cool slightly so it’s easy to spoon.
- Fill Brownie Centers: Carefully spoon the warm caramel into the wells of each brownie bite. Fill generously but leave a small border around the edges to prevent overflow. This step ensures each bite has a luscious, gooey caramel center.
- Sprinkle with Sea Salt: Lightly sprinkle fine sea salt over the tops of the caramel-filled brownies. The salt balances the sweetness, enhancing the chocolate and caramel flavors while adding a subtle crunch.
- Cool Completely and Serve: Allow the brownie bites to cool completely at room temperature. This helps the caramel set and makes them easier to remove from the muffin tin. Once cooled, gently lift each bite from the tin and arrange on a serving platter. Enjoy immediately, or store for later.
- Optional Storage: Store any leftovers in an airtight container at room temperature for up to 3 days. For longer storage, keep them in the refrigerator for up to a week, or freeze for up to a month. Rewarm briefly before serving for a gooey texture.
Notes
- Always use baking spray with flour or grease and flour the mini muffin tin to prevent sticking.
- Measure flour properly by spooning into the cup instead of scooping directly to avoid dense brownies.
- Slightly underbake brownies for a fudgy, moist texture that pairs perfectly with caramel.
- Use high-quality chocolate chips and unsweetened cocoa powder for richer flavor.
- Press gently when creating wells for caramel to avoid breaking the brownies.
- Sprinkle fine sea salt after filling to balance sweetness and enhance flavor.
- Slightly cool the caramel before adding to the brownie wells to prevent overflow.
- Store unfilled brownies in an airtight container to maintain freshness if preparing ahead.
Chef’s Secrets: Secrets For Perfect Bites
The key to perfectly soft, fudgy brownie bites lies in the careful combination of ingredients and gentle mixing.
Melt the butter and chocolate slowly to avoid burning and to create a smooth base.
Adding a pinch of instant coffee enhances the chocolate depth without tasting like coffee.
When creating wells for the caramel, press gently to avoid breaking the brownie. Finally, sprinkle fine sea salt after filling to balance sweetness and bring out flavors in every bite.
These small techniques elevate the simple brownie into a professional-quality treat.
Serving Suggestions: Ways To Enjoy Brownies
These bite-sized brownies are versatile and can be served in many ways.
Enjoy them warm for a gooey, decadent experience, or chilled for a firmer caramel center.
Pair with a scoop of vanilla ice cream or fresh berries for an elegant dessert.
They also make excellent gifts or party treats, arranged beautifully on a platter or in decorative cupcake liners.
For coffee lovers, serving alongside a latte or hot chocolate enhances the chocolate-caramel harmony and creates a satisfying indulgence for any occasion.
Storage Tips: How To Keep Fresh
To maintain freshness, store the brownie bites in an airtight container at room temperature for up to three days.
For longer storage, refrigerate them for up to a week, which also slightly firms the caramel for easier handling.
They can also be frozen for up to a month—place parchment paper between layers to prevent sticking.
Rewarm frozen or refrigerated brownies in a microwave for 10–15 seconds to enjoy a soft, gooey texture.
Proper storage ensures every bite stays moist, flavorful, and indulgent.
Frequently Asked Questions
1. Can I make these brownies ahead of time?
Yes! You can bake the brownie bites in advance and fill them with caramel just before serving.
Store the unfilled brownies in an airtight container at room temperature for up to three days or freeze them for longer storage. Filling with caramel later keeps the centers soft and gooey.
2. Can I use store-bought caramel sauce instead?
Absolutely! You can replace melted caramels with a thick, high-quality store-bought caramel sauce.
Ensure it’s not too runny to avoid overflow when filling the wells. Spoon carefully into the brownie centers and sprinkle with sea salt for the perfect balance of flavors.
3. Can I make these gluten-free?
Yes, by substituting all-purpose flour with a gluten-free baking flour blend. Choose a blend that includes xanthan gum or another binding agent to maintain the brownies’ texture.
The flavor remains rich and fudgy, and the caramel filling works the same.
4. How do I prevent the caramel from leaking?
Press gently to create wells in the brownies and allow them to cool slightly before adding caramel.
Avoid overfilling; leave a small border around the edges. Slightly cooling the caramel before spooning it in also helps prevent run-off.
5. Can I adjust sweetness or chocolate flavor?
Yes, you can reduce the granulated sugar slightly for a less sweet version, or increase the cocoa by 1–2 tablespoons for deeper chocolate flavor.
Using high-quality chocolate chips or a dark chocolate variety also intensifies the taste. Just maintain the balance with the caramel and salt to keep the perfect sweet-salty profile.