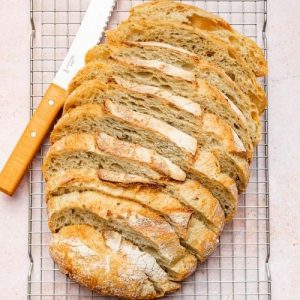
This aromatic sourdough bread combines fragrant rosemary with a subtle kick of freshly ground black pepper, creating a loaf that’s both flavorful and wholesome.
Naturally rich in fiber and plant-based protein from its simple ingredients, it supports digestion and satiety.
Low in saturated fat and free from refined sugars, this bread is perfect for everyday meals, whether for quick sandwiches, toast, or a comforting homemade snack.
Rosemary Sourdough Bread
Equipment
- 1 large mixing bowl
- 1 tea towel
- 1 banneton or proofing basket
- Parchment paper (enough to lift bread)
- 1 Dutch oven
- 1 Sharp Knife or Bread Lame
- Measuring spoons
- Digital kitchen scale
Ingredients
- 440 grams all-purpose flour
- 320 grams water room temperature
- 100 grams active sourdough starter
- 10 grams sea salt
- 2 tablespoons fresh rosemary finely chopped
- 1 teaspoon black pepper freshly ground
Instructions
- Mix the Dough: In a large mixing bowl, combine the flour, water, and active sourdough starter. Use your hands or a spatula to mix until a rough, shaggy dough forms. Don’t worry about making it smooth yet—the key is to hydrate the flour fully to prepare it for gluten development.
- Initial Rest (Autolyse): Cover the bowl loosely with a tea towel and let the dough rest at room temperature for 40 minutes. This process allows the flour to absorb water completely, which improves gluten formation and naturally develops flavor.
- Season and Incorporate Herbs: After resting, sprinkle in the sea salt, finely chopped rosemary, and freshly ground black pepper. Gently fold the dough until the seasonings are evenly distributed, taking care not to overwork the dough to keep it light and airy.
- First Fold (Gluten Development): Dampen your hands to prevent sticking. Reach under the dough on the side farthest from you and lift it toward the center. Rotate the bowl and repeat on all sides, wrapping the dough like a package. Finally, scoop your hands under the dough and flip it completely. This completes the first fold.
- Repeated Folding (Strengthen Dough): Repeat the folding process every 30 minutes for a total of 7 folds over three hours. Each fold strengthens the gluten, traps gas from fermentation, and gradually makes the dough more elastic and airy.
- Pre-Shaping Rest: Remove the dough from the bowl and let it rest on a lightly floured surface for 20 minutes. This short pause relaxes the dough, making it easier to shape without tearing the surface.
- Prepare the Banneton: Dust your banneton or proofing basket with a mix of wheat and rice flour to prevent sticking and create a rustic texture. This preparation ensures the dough will release easily after proofing.
- Shaping the Loaf: Gently shape the dough into a tight round or oval, folding edges toward the center and creating surface tension. Avoid pressing too hard to preserve the air bubbles formed during fermentation. Place the shaped dough seam-side up in the prepared banneton or lined bowl. Dust lightly with flour.
- Proofing in the Fridge: Cover the dough with a plate or tea towel and refrigerate overnight, or at least 8 hours. This slow, cold fermentation enhances flavor depth and improves the final texture of the loaf.
- Preheat the Oven and Dutch Oven: Place your Dutch oven in the oven and preheat to 260°C (500°F) or the highest safe temperature. Allow it to heat for an additional 30 minutes after reaching temperature to ensure it is extremely hot for optimal oven spring.
- Transfer and Score the Dough: Remove the dough from the fridge and invert it onto a piece of parchment paper. Use a sharp knife or bread lame to score shallow slashes on the top, allowing the bread to expand in the oven in a controlled way.
- Bake Covered: Carefully lift the dough into the preheated Dutch oven using the parchment paper. Place the lid on and return it to the oven. Reduce the temperature to 230°C (450°F) and bake for 20 minutes. This trapped steam will help the loaf rise and form a crisp, glossy crust.
- Bake Uncovered: Remove the lid and continue baking for another 20–25 minutes. This allows the crust to develop deep color and a satisfying crunch while fully cooking the interior.
- Cooling the Bread: Remove the loaf carefully using the parchment paper and place it on a wire cooling rack. Allow it to cool completely before slicing to avoid a gummy texture. If necessary, it is safe to let the loaf cool inside the Dutch oven.
- Serve and Enjoy: Slice and serve as desired. Perfect for sandwiches, toast, or a flavorful snack, the rosemary and black pepper aroma will enhance any meal.
Notes
- Use an active sourdough starter that has been recently fed for the best rise and flavor.
- For best results, weigh ingredients with a digital kitchen scale rather than using volume measurements, as accuracy is key in sourdough baking.
- Room temperature water ensures proper fermentation without shocking the yeast.
- If your kitchen is cool, you can allow the dough to ferment slightly longer during folds or overnight proofing for deeper flavor.
- When scoring the bread, shallow, confident cuts are better than deep or hesitant ones to control expansion.
- Patience is key—avoid slicing the bread while it’s hot, as the interior needs time to set properly.
Chef’s Secrets for Perfect Loaf
To achieve a beautifully crusty, airy sourdough loaf, always handle the dough gently during folding and shaping.
The folding process builds strength without deflating the air bubbles essential for a light crumb.
Use a mix of wheat and rice flour for dusting the banneton to prevent sticking while adding a rustic texture.
Slow, cold fermentation in the fridge enhances flavor complexity, while scoring the dough properly allows for a controlled oven spring and an artisanal appearance.
Remember, every kitchen’s temperature and humidity differ—trust your dough and adjust timing as needed.
Serving Suggestions for Maximum Enjoyment
This aromatic sourdough pairs beautifully with simple ingredients.
For a cozy breakfast or snack, toast slices and spread with butter, cream cheese, or avocado.
Use it to make gourmet grilled cheese sandwiches, allowing the black pepper and rosemary to complement melting cheeses like Gruyère or sharp cheddar.
It also works wonderfully as a side for soups and stews or as a base for bruschetta.
For an elevated touch, drizzle with olive oil and a pinch of sea salt for an instant appetizer.
Storage Tips to Maintain Freshness
To preserve the loaf’s texture and flavor, store it uncovered at room temperature for up to 2 days in a cool, dry spot.
Avoid plastic bags, which trap moisture and soften the crust.
For longer storage, slice the bread and freeze in an airtight bag for up to 3 months; thaw slices at room temperature or toast directly from frozen.
Avoid refrigeration, as it can dry out sourdough and make it lose its desirable chewiness.
Frequently Asked Questions
1. Can I use a different type of flour?
Yes, you can experiment with whole wheat or spelt flour, though adjustments to water may be needed.
The loaf may be denser, but the flavor will be richer and nuttier.
2. What if my starter isn’t very active?
If your starter is sluggish, feed it 4–6 hours before making the dough to ensure maximum rise. A weak starter may result in a flatter loaf.
3. How do I know when the bread is fully baked?
The crust should be golden brown and firm. Tap the bottom—if it sounds hollow, the bread is done.
Internal temperature should reach around 95°C (203°F).
4. Can I add other herbs or spices?
Absolutely! Thyme, oregano, or a pinch of chili flakes can be added. Just reduce salt slightly to avoid overpowering the loaf.
5. How do I achieve a crispier crust?
Bake with a preheated Dutch oven and keep the lid on for the first 20 minutes to trap steam, then remove it to finish baking.
You can also mist the loaf with water before baking for extra crunch.