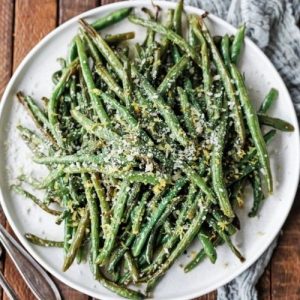
These roasted green beans are a simple yet flavorful side that’s perfect for any meal.
Packed with fiber, plant-based protein, and heart-healthy fats from olive oil, they’re a guilt-free addition to your plate.
Quick to prep, hands-off in the oven, and easily customizable with garlic, lemon, or cheese, this recipe is ideal for everyday dinners or effortless meal prep.
Roasted Green Beans
Equipment
- 1 large mixing bowl
- 1 Sheet Pan
- Parchment paper (enough to line the sheet pan)
- Measuring Cups and Spoons
Ingredients
- 2 pounds fresh green beans trimmed
- ¼ cup olive oil
- Coarse salt to taste
- Freshly cracked black pepper to taste
Optional add-ins for flavor:
- 2 cloves garlic finely minced
- Zest of 1 lemon
- Juice of ½ lemon
- 3 tablespoons grated Parmigiano Reggiano
Instructions
- Preheat the Oven for Perfect Roasting: Set your oven to 425°F (220°C) and allow it to fully preheat while you prepare the green beans. This high temperature is essential to achieve a lightly caramelized exterior while keeping the beans tender inside. Using a fully preheated oven ensures even cooking and the signature slightly crisp texture of roasted green beans.
- Prepare the Green Beans: Wash your fresh green beans under cold running water and pat them dry with a clean kitchen towel or paper towels. Trim the stem ends by snapping them off with your fingers or slicing them with a knife. Proper trimming ensures even roasting and makes the beans more enjoyable to eat.
- Season the Green Beans with Oil and Spices: Place the trimmed beans into a large mixing bowl. Drizzle the olive oil evenly over the beans, then sprinkle with coarse salt and freshly cracked black pepper. Toss the beans thoroughly using your hands or a spoon until each bean is lightly coated with oil and seasoning. Taste a single bean to check the seasoning and adjust salt or pepper if needed.
- Arrange Beans on Sheet Pan: Line a sheet pan with parchment paper for easy cleanup and to prevent sticking. Spread the beans evenly across the pan in a single layer, making sure they are not overcrowded. Crowding the beans can cause them to steam instead of roast, preventing them from achieving a golden, caramelized finish.
- Roast Until Tender and Slightly Browned: Place the sheet pan on the middle or upper third rack of the preheated oven. Roast the beans for 20 minutes, turning or shaking the pan halfway through to promote even browning on all sides. Keep a close eye toward the end of cooking to ensure the beans are tender but still retain a slight crisp bite.
- Add Garlic for Extra Flavor: As soon as the beans are removed from the oven, add the finely minced garlic to the hot beans. Toss gently so the residual heat cooks the garlic just enough to mellow its raw sharpness without burning it. This step infuses the beans with aromatic flavor and adds depth without overpowering their natural taste.
- Finish with Lemon and Parmigiano: Transfer the roasted beans to a serving bowl. Sprinkle the lemon zest over the top and squeeze fresh lemon juice to taste. For an optional cheesy twist, add grated Parmigiano Reggiano and toss lightly. The combination of bright citrus and savory cheese elevates the beans to a more sophisticated, restaurant-style side dish.
- Customize Your Garnish and Serve Immediately: Consider additional garnishes like slivered almonds, fresh herbs, crumbled goat cheese, or crispy bacon for added texture and flavor. Serve the roasted green beans immediately for the best taste and texture. While they can be kept warm for a short period, they are at their peak when freshly roasted, tender, and slightly crisp.
- Storage and Reheating Tips: If you have leftovers, allow the beans to cool completely before transferring them to an airtight container. Refrigerate for up to three days. To reheat, sauté the beans in a skillet over medium heat with a splash of water, stock, or butter until warmed through and slightly tender again. Re-topping with fresh garnishes restores flavor and texture.
Notes
- Always use fresh, high-quality green beans for the best texture and flavor.
- Frozen green beans can work in a pinch; blot them dry before roasting to avoid excess moisture.
- Adjust seasoning to taste, and don’t be afraid to experiment with spices like garlic powder, red pepper flakes, or smoked paprika.
- Trim the stems evenly for consistent cooking and a more polished presentation.
- For extra crispness, avoid overcrowding the pan—give the beans room to roast properly.
- Optional toppings like cheese, nuts, or herbs can be added after roasting for maximum flavor impact.
Chef’s Secrets for Flavorful Beans
Roasting green beans at a high temperature brings out a natural sweetness while creating lightly caramelized edges.
For a depth of flavor, toss the beans in olive oil and salt before they even touch the oven—this ensures every bean is seasoned from the start.
Adding minced garlic immediately after roasting uses residual heat to mellow its bite and infuse aroma. Lemon juice and zest brighten the dish, while a sprinkle of Parmigiano Reggiano adds savory richness without overwhelming the beans.
Small adjustments, like tossing beans halfway through roasting or using parchment paper for even browning, can elevate your results significantly.
Serving Suggestions for Every Meal
These roasted green beans are versatile enough to pair with nearly any main course.
Serve them alongside grilled chicken, pan-seared fish, or roasted meats for a quick, nutritious side.
They also complement vegetarian dishes like grain bowls, quinoa salads, or pasta.
For a dinner party, top with toasted almonds, crispy shallots, or crumbled goat cheese for a restaurant-quality presentation.
Because they maintain their flavor and texture well, these green beans are also great for meal prep or as part of a lunchbox.
Storage Tips to Keep Fresh
Cooked green beans are best enjoyed immediately, but leftovers can be stored safely for up to three days in the refrigerator.
Use an airtight container to maintain freshness and prevent odor transfer.
Avoid freezing roasted green beans, as they can become mushy and lose their texture.
To reheat, gently sauté over medium heat with a splash of water, vegetable broth, or a touch of butter.
Add fresh garnishes after reheating to restore flavor, aroma, and visual appeal.
Frequently Asked Questions
1. Can I use frozen green beans instead of fresh?
Yes, frozen beans can be used. Blot them dry to remove excess moisture before roasting. They may not be as tender as fresh beans, but they will still taste delicious.
2. How can I make these green beans extra crispy?
Avoid overcrowding the pan, roast at a high temperature, and turn the beans halfway through cooking.
Draining excess moisture and using parchment paper helps achieve a light, caramelized crisp.
3. Can I add other seasonings besides salt and pepper?
Absolutely! Garlic powder, red pepper flakes, smoked paprika, cumin, or even ranch seasoning work wonderfully. Experiment to suit your taste preferences.
4. How do I store and reheat leftovers?
Store cooled beans in an airtight container in the fridge for up to three days. Reheat in a skillet over medium heat with a splash of water, stock, or butter until warmed and slightly tender.
5. Can I add toppings or garnishes?
Yes! Optional toppings include lemon zest, Parmigiano Reggiano, slivered almonds, crumbled goat cheese, crispy bacon, or fresh herbs like parsley, thyme, or basil.
Add these after roasting for maximum flavor impact.