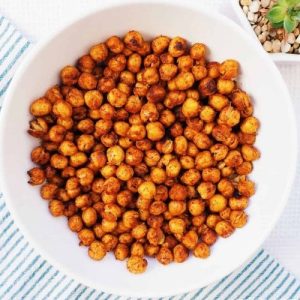
Crunchy, flavorful, and utterly satisfying, these roasted garlic paprika chickpeas make a perfect snack or topping for salads and bowls.
Packed with plant-based protein, fiber, and healthy fats while being low in saturated fat, they’re a nutritious alternative to processed snacks.
Quick to prepare and easy to customize, this recipe is ideal for everyday cooking, meal prep, or a wholesome, guilt-free treat.
Roasted Garlic Paprika Chickpeas
Equipment
- 1 Large Baking Sheet
- Measuring Spoons (set)
- Colander
- Kitchen Scale
- Clean Tea Towel or Paper Towels
Ingredients
- 1 can 28 oz Chickpeas, drained and rinsed
- 1 tbsp Vegetable Oil or neutral oil of choice
- 1 tsp Garlic Powder adjust to taste
- 1 tsp Paprika adjust to taste
- 1 tsp Onion Powder adjust to taste
- ½ tsp Salt adjust to taste
Instructions
- Preheat the Oven for Perfect Roasting: Begin by preheating your oven to 400°F (200°C). Ensuring the oven reaches the proper temperature before placing the chickpeas inside is crucial for achieving a perfectly crunchy texture. While the oven warms, you can prepare the chickpeas and seasoning to save time and make the process seamless.
- Drain and Rinse Chickpeas Thoroughly: Open your can of chickpeas (28 oz) and pour them into a colander. Rinse them thoroughly under cold running water to remove the canned liquid, which can impart a slightly metallic or starchy taste. Shake off as much water as possible, as excess moisture can prevent the chickpeas from crisping evenly.
- Remove Skins for Extra Crunch: Spread the rinsed chickpeas on a clean tea towel or several layers of paper towels. Gently rub the chickpeas with the towel to loosen and remove the outer skins. This small step significantly improves the crunchiness of your roasted chickpeas, creating a satisfying bite with every piece. Discard the skins once removed.
- Prepare Seasoning and Oil Mixture: In a small bowl, combine 1 tablespoon of vegetable oil with 1 teaspoon garlic powder, 1 teaspoon paprika, 1 teaspoon onion powder, and ½ teaspoon salt. Stir well to create an even, aromatic mixture that will coat each chickpea thoroughly. You can adjust the seasonings according to your taste preferences—add a pinch more paprika for smokiness or extra garlic powder for a bolder flavor.
- Coat Chickpeas with Seasoning: Transfer the peeled chickpeas to a large mixing bowl or leave them on the baking sheet. Pour the oil and seasoning mixture over them. Using your hands (or a spatula if preferred), gently massage and toss the chickpeas until every piece is evenly coated with the flavorful mixture. This ensures consistent seasoning and helps the oil adhere for optimal roasting.
- Arrange Chickpeas on Baking Sheet: Spread the seasoned chickpeas in a single layer on a large baking sheet. Make sure they are evenly spaced and not overcrowded—this allows hot air to circulate freely and helps each chickpea crisp up evenly. Overlapping chickpeas can lead to steaming rather than roasting, which may reduce the crunchiness.
- Roast Until Golden and Crispy: Place the baking sheet in the preheated oven, ideally on the middle rack. Roast the chickpeas for 40 minutes. There is no need to flip them halfway, but feel free to gently shake the pan once or twice if you like to ensure maximum evenness. The chickpeas are done when they are golden brown, fragrant, and have a satisfying crunch when bitten.
- Cool and Crisp Further: Once roasted, remove the chickpeas from the oven and let them cool on the baking sheet for at least 5–10 minutes. Cooling allows the chickpeas to crisp up even more and reach their optimal texture. Taste a few to check seasoning and add a tiny pinch of salt if needed.
- Serve or Store for Later Enjoyment: Serve the roasted garlic paprika chickpeas immediately as a crunchy snack, or use them as a topping for salads, soups, or grain bowls. If storing, allow them to cool completely and transfer to an airtight container. They can remain crisp for several days at room temperature, making them perfect for meal prep or quick grab-and-go snacking.
Notes
- Chickpea Choice: Canned chickpeas are convenient, but you can use cooked dried chickpeas for a more robust flavor. Just ensure they are fully drained and patted dry before roasting.
- Pat Dry is Key: Removing excess water from the chickpeas ensures they roast to a crispy texture rather than steaming in the oven.
- Customize Seasoning: Garlic, paprika, and onion powder form the base, but feel free to experiment with smoked paprika, cayenne, cumin, or chili powder for a personal twist.
- Crisping Tip: Removing the skins before roasting helps make the chickpeas extra crunchy.
- Batch Cooking: This recipe doubles well for meal prep—just use two large baking sheets to avoid overcrowding.
Chef’s Secrets for Crispy Chickpeas
To achieve the ultimate crunch, the key lies in preparation.
Always rinse and drain your chickpeas thoroughly, then remove their skins.
Skins retain moisture, which can prevent proper crisping.
Massage your chickpeas gently with oil and seasonings to coat evenly without bruising them.
Using a middle rack in a preheated oven ensures uniform heat distribution.
For an extra crisp exterior, consider giving them a light shake or stir in the last 10 minutes of roasting.
Serving Suggestions for Flavor Pairing
These roasted chickpeas are incredibly versatile.
Serve them as a standalone snack with your favorite dip, sprinkle them over salads or grain bowls for added texture, or use them to top soups for a flavorful crunch.
Pair them with fresh vegetables, avocado, or hummus for a complete, nutrient-packed snack.
They also work beautifully as a party appetizer, seasoned lightly with extra paprika or chili for a spicy kick.
Storage Tips for Freshness
To maintain maximum crispiness, allow the chickpeas to cool completely before storing them in an airtight container.
Keep them at room temperature for up to 4–5 days.
Avoid refrigerating, as moisture can soften the chickpeas.
If they lose their crunch, simply spread them on a baking sheet and reheat at 350°F (175°C) for 5–7 minutes to restore their crisp texture.
Frequently Asked Questions
1. Can I use dried chickpeas instead of canned?
Yes! Soak dried chickpeas overnight, cook until tender, and then follow the same roasting steps.
Make sure they are completely dry before roasting to achieve the same crispiness as canned chickpeas.
2. How can I make them extra crunchy?
Removing the skins before roasting and ensuring they are patted dry are the two most important steps.
Additionally, roasting at a high temperature and spreading them in a single layer prevents steaming and maximizes crunch.
3. Can I adjust the seasoning for different flavors?
Absolutely! These chickpeas are a blank canvas.
Add smoked paprika, cumin, cayenne, curry powder, or even a pinch of cinnamon for sweet-savory variations.
Adjust seasoning quantities to taste before roasting.
4. Can I store them in the fridge?
It’s not recommended. Refrigeration can make the chickpeas soggy due to moisture.
Keep them in an airtight container at room temperature instead. Reheat in the oven briefly if they soften.
5. How long do they last once roasted?
Stored in an airtight container at room temperature, roasted chickpeas remain crispy for about 4–5 days.
Beyond that, they may begin to lose crunch, but a quick oven reheat can restore their texture.