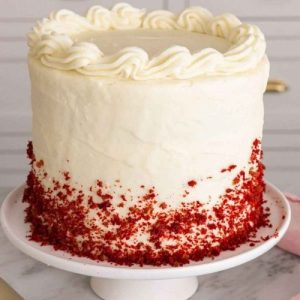
This Red Velvet Cake is a timeless favorite with a tender crumb, rich cocoa undertone, and silky cream cheese frosting that makes every bite irresistible.
While indulgent, it provides a balance of protein from eggs and cream cheese, along with calcium for bone health.
Despite being a treat, it can fit into an everyday celebration or special occasion thanks to its simple steps, reliable texture, and crowd-pleasing flavor.
Red Velvet Cake
Equipment
- 3 × 6-inch round cake pans or 2 × 9-inch pans
- Mixing bowls (medium + large)
- Electric hand mixer or stand mixer with paddle attachment
- Wire cooling rack – 1
- Piping bag (1) with decorative tip
- Bench scraper or offset spatula (1)
- Serrated knife (optional, for trimming domes)
Ingredients
For the Cake:
- 2 ½ cups 300 g all-purpose flour
- 1 teaspoon salt
- 1 teaspoon baking soda
- ½ cup 113 g unsalted butter, softened
- 1 ½ cups 300 g granulated sugar
- 2 large eggs room temperature
- 2 teaspoons vanilla extract
- 2 tablespoons cocoa powder
- 1 cup 240 ml buttermilk, room temperature
- 1 tablespoon white vinegar
- 1 –2 tablespoons liquid red food coloring
For the Cream Cheese Frosting:
- 16 oz 454 g cream cheese, softened
- 1 ½ cups 340 g unsalted butter, softened
- 1 teaspoon vanilla extract
- Pinch kosher salt
- 5 ½ cups 675 g confectioners’ sugar, sifted
Instructions
- Prepare Cake Pans and Oven: Begin by preheating your oven to 350°F (175°C). This ensures it reaches the right temperature by the time your batter is ready. Lightly grease three 6-inch cake pans (or two 9-inch pans, if preferred) with butter, then dust with flour to prevent sticking. For extra security, line the bottom of each pan with a circle of parchment paper. Set them aside on a baking sheet while you prepare the batter.
- Mix Dry Ingredients: In a medium bowl, sift together all-purpose flour, salt, and baking soda. Sifting helps break up clumps and aerates the flour, which creates a finer, softer cake crumb. Whisk briefly to ensure everything is evenly distributed. Keep this bowl nearby, as you’ll incorporate it into the wet mixture later.
- Cream Butter and Sugar: In a large mixing bowl, or in the bowl of a stand mixer fitted with the paddle attachment, add unsalted butter at room temperature. Beat on medium speed until smooth and creamy, about 1–2 minutes. Add the granulated sugar gradually and continue beating until the mixture looks pale, light, and fluffy. This process usually takes about 3 minutes and is important for incorporating air, which helps the cake rise.
- Incorporate Eggs and Vanilla: Crack the eggs one at a time into the butter-sugar mixture, beating well after each addition to fully blend. Scrape down the sides of the bowl as needed to ensure no streaks of egg remain. Once the eggs are incorporated, add the vanilla extract and beat again for 30 seconds. At this stage, your mixture should look smooth and glossy.
- Blend Cocoa Powder into Batter: Sift the cocoa powder directly over the butter mixture. Mix on low speed until just combined. Cocoa adds subtle chocolate depth, but it must be blended gently to avoid overworking the batter. Scrape down the bowl once more to make sure no dry cocoa remains at the bottom.
- Prepare Buttermilk Mixture: In a liquid measuring cup, combine buttermilk, vinegar, and red food coloring. The vinegar works with the baking soda to give the cake its tender, velvety texture. Stir gently with a spoon until the color is evenly distributed. The shade will look quite bold here but will bake into a classic deep red hue.
- Alternate Wet and Dry Additions: With the mixer running on low speed, add half of the flour mixture to the butter bowl and mix just until incorporated. Follow with half of the buttermilk mixture. Repeat this process with the remaining flour and buttermilk, always mixing lightly to avoid overdeveloping the gluten. Stop the mixer and scrape down the bowl between additions so every part of the batter is evenly blended. The final batter should be smooth, thick, and vividly red.
- Fill Cake Pans Evenly: Divide the batter evenly among your prepared pans. To ensure uniform layers, use a kitchen scale or large measuring cup to portion out the batter. Smooth the tops with a spatula so the cakes bake flat. Gently tap each pan on the counter to release any large air bubbles.
- Bake the Cake Layers: Place the pans into the preheated oven and bake for 30–35 minutes. The cakes are done when the centers spring back lightly when touched, or when a toothpick inserted into the center comes out clean with just a few moist crumbs. Avoid opening the oven door too often, as temperature changes can cause sinking.
- Cool Cakes Completely: When baked, remove the pans from the oven and allow the cakes to cool in their pans for about 10 minutes. Carefully run a knife around the edges to loosen, then invert each layer onto a wire rack. Peel off the parchment paper and let the cakes cool completely before frosting. This prevents the frosting from melting or sliding off.
- Make Cream Cheese Frosting: In a clean large bowl or stand mixer, add the cream cheese and butter, both at room temperature. Beat on medium speed for about 3 minutes, until the mixture becomes fluffy and smooth. Add the vanilla extract and a pinch of salt, then mix again. Next, sift the confectioners’ sugar to remove lumps. Gradually add the sugar, about 1 cup at a time, mixing on low speed until incorporated. Scrape down the bowl after each addition. Once all the sugar is in, increase the speed to medium and beat for about 1 minute until the frosting is airy, thick, and spreadable. Transfer about 1 cup of frosting to a piping bag fitted with your desired decorative tip for later garnishing.
- Assemble the Cake Layers: Place the first cake layer on a serving plate or cake stand. Spread a generous ½ cup of frosting evenly over the surface. Place the second cake layer on top, pressing lightly to secure, and spread another layer of frosting. Repeat if using three layers. Place the final cake layer on top, bottom-side up, for a flat finish.
- Frost Exterior of Cake: Using an offset spatula or bench scraper, spread the remaining frosting over the top and sides of the cake. Start with a thin “crumb coat” layer to seal in loose crumbs. Chill the cake for 15–20 minutes to set the crumb coat, then apply the final, thicker frosting layer. Smooth the surface for a clean look or create swoops for a rustic finish.
- Decorate and Set: Use the piping bag with reserved frosting to add a decorative border around the top or base of the cake. You can also sprinkle cake crumbs, chocolate shavings, or edible glitter for an elegant finish. Chill the assembled cake for about 1 hour before serving to allow the frosting to firm up and hold shape.
- Serving and Storing: Slice with a sharp serrated knife, wiping it clean between cuts for neat slices. Leftover cake can be kept covered at room temperature for up to 2 days or refrigerated for up to 1 week. Bring chilled cake to room temperature before serving for the best flavor and texture.
Notes
- For even layers, use a kitchen scale to divide batter precisely between pans.
- Always bring butter, eggs, and cream cheese to room temperature; this ensures smooth mixing and a tender crumb.
- Sift dry ingredients to remove lumps and keep the cake light and airy.
- If your cake layers dome while baking, trim them with a serrated knife or use cake strips for a level finish.
- Use a gentle hand when spreading frosting; the cake layers are delicate and can break if handled roughly.
- Red food coloring can be adjusted depending on your preferred shade; more coloring creates a brighter red, while less results in a subtle, deeper hue.
- If buttermilk is unavailable, you can make a substitute by adding 1 tablespoon of vinegar or lemon juice to 1 cup of milk.
- To avoid overmixing, alternate adding dry and wet ingredients slowly, mixing just until combined.
Chef’s Secrets for Perfect Cake
To achieve a bakery-quality Red Velvet Cake at home, focus on ingredient temperature and mixing technique.
Room-temperature eggs, butter, and cream cheese integrate more evenly, producing a light, tender crumb.
Sifting cocoa and flour ensures no lumps disrupt the smooth texture.
For vibrant layers, adjust the food coloring according to your preference.
When stacking, always level the cake layers to prevent tipping and create a polished presentation.
Finally, chilling the cake briefly before applying the final frosting layer helps maintain sharp edges and clean lines, giving your cake a professional finish.
Serving Suggestions for Best Enjoyment
This cake shines on its own but can be paired with complementary flavors for a special touch.
Serve with fresh berries like raspberries or strawberries to add a tart contrast to the sweet, tangy frosting.
A drizzle of dark chocolate or a sprinkle of toasted nuts adds visual appeal and texture. For a festive twist, dust with edible gold or cocoa powder.
Red Velvet Cake is ideal for birthdays, anniversaries, or casual afternoon tea, and slices beautifully, making it perfect for sharing at gatherings.
Storage Tips to Maintain Freshness
Red Velvet Cake stays moist and flavorful when stored properly.
For short-term storage, cover the cake tightly at room temperature for up to 2 days.
For longer storage, refrigerate in an airtight container for up to 1 week.
When freezing, wrap each layer separately in plastic wrap, then store in a freezer-safe bag or container for up to 3 months.
Thaw in the refrigerator overnight before frosting or serving.
Always allow the cake to come to room temperature before slicing for optimal texture and taste.
Frequently Asked Questions
1. Can I use different cake pan sizes?
Yes! You can bake this recipe in two 9-inch pans instead of three 6-inch pans.
The layers will be slightly thinner, so reduce baking time by 5–7 minutes and check doneness with a toothpick.
2. How do I make the frosting less sweet?
Reduce confectioners’ sugar slightly, or add a teaspoon of lemon juice to balance the sweetness.
Taste as you go, and beat until the texture remains smooth and fluffy.
3. What if I don’t have buttermilk?
You can make a quick substitute by combining 1 cup of milk with 1 tablespoon of white vinegar or lemon juice.
Let it sit for 5 minutes before using.
4. Can I use natural food coloring instead of liquid?
Yes, gel or natural food coloring works well. Adjust the quantity gradually to achieve the desired red hue.
Gel colors are more concentrated, so less is usually needed.
5. How do I prevent the cake from cracking or doming?
Use cake strips or wrap the pan with damp strips of cloth to regulate heat and encourage even rising.
Avoid opening the oven door too early, and level the layers with a serrated knife if domes form.