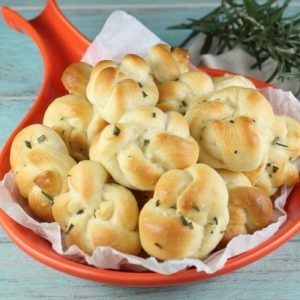
Soft, buttery, and infused with fragrant rosemary and garlic, these Quick Rosemary Garlic Knots are an irresistible addition to any meal.
Light yet satisfying, they provide energy from wholesome carbs and healthy fats from butter, making them a delightful everyday treat.
Perfect for busy weeknights or meal prep, they’re quick to make, versatile, and sure to impress family and guests.
Quick Rosemary Garlic Knots
Equipment
- 1 large mixing bowl
- 1 small skillet or saucepan
- 1 baking sheet, lined
- Rolling Pin
- Pizza Cutter
- Measuring Cups and Spoons
- Pastry brush
Ingredients
For the Dough:
- 1 cup warm milk 85–90°F / 29–32°C
- 1 tablespoon melted butter
- 2 packages Platinum Red Star Yeast
- 1 tablespoon sugar
- 1 teaspoon kosher salt
- 2 cups all-purpose flour
- ½ cup all-purpose flour for rolling
For the Garlic-Rosemary Butter:
- ½ cup salted butter
- 2 teaspoons minced garlic
- 1 teaspoon minced fresh rosemary
- ½ teaspoon kosher salt
Instructions
- Activate the Yeast: Pour 1 cup of warm milk (85–90°F / 29–32°C) into a large mixing bowl. Add 1 tablespoon of melted butter, 1 tablespoon of sugar, and 2 packages of Platinum Red Star Yeast. Stir gently until all ingredients are combined. Let the mixture sit for about 5 minutes, or until the yeast begins to foam and bubble. This step ensures your dough will rise beautifully and develop a soft, airy texture.
- Combine Dough Ingredients: Once the yeast is activated, add 1 teaspoon kosher salt and 2 cups of all-purpose flour to the bowl. Stir using a wooden spoon or spatula until the dough starts to come together. It should form a slightly sticky, shaggy mass. This step is essential for evenly distributing salt and flour throughout the dough for consistent flavor and texture.
- Knead the Dough: Transfer the dough to a clean, well-floured surface, using about ½ cup extra flour for dusting. Begin kneading by pressing and folding the dough repeatedly with the heels of your hands. Continue for 3–5 minutes until the dough becomes smooth, elastic, and slightly springy to the touch. Proper kneading strengthens the gluten structure, giving your rolls a tender, chewy interior and a light crumb.
- First Rise: Shape the kneaded dough into a ball and place it back into the mixing bowl. Cover the bowl loosely with a clean kitchen towel or plastic wrap. Let the dough rest in a warm, draft-free spot for 15 minutes. During this time, the dough will begin to rise and expand slightly, making it easier to shape into knots while maintaining a soft texture.
- Divide and Roll Dough: After the initial rise, gently punch down the dough to release excess air. Divide the dough evenly into two sections. On a floured surface, roll each section into a rectangle approximately 10–12 inches in length (it can be slightly oval-shaped). Rolling evenly ensures uniform-sized knots, which bake consistently and look visually appealing.
- Cut Dough Into Strips: Using a pizza cutter or sharp knife, slice the rolled dough into 1-inch-wide strips. Then cut each strip in half, creating shorter rope-like pieces that will be easy to twist into knots. Maintaining consistent thickness ensures all knots bake evenly and achieve a perfect golden-brown color.
- Shape the Knots: Take each dough strip and gently roll it into a rope. Twist the rope into a loose knot and tuck the ends underneath into the center, forming a neat knot shape. Place each knot onto a lined baking sheet, leaving about 2 inches of space between them to allow room for expansion. Shaping the knots with care ensures they hold their shape during baking and look professional.
- Prepare for Baking: Cover the shaped knots lightly with a towel or plastic wrap while you preheat the oven. This brief rest allows the dough to relax and prevents shrinking during baking. Preheat your oven to 375°F (190°C). Ensuring the oven is fully heated before baking guarantees that the knots cook evenly and develop a golden crust.
- Bake the Knots: Place the baking sheet with the knots into the preheated oven. Bake for 10–12 minutes, or until the tops turn a beautiful golden-brown color. Keep an eye on them, as ovens vary slightly. Proper baking locks in softness while creating a slightly crisp exterior, perfect for brushing with garlic butter.
- Make Garlic-Rosemary Butter: While the knots are baking, melt ½ cup of salted butter in a small skillet or saucepan over low heat. Add 2 teaspoons of minced garlic and 1 teaspoon of fresh minced rosemary. Cook gently for about 5 minutes, stirring frequently, until the garlic becomes fragrant but not browned. This step infuses the butter with aromatic flavors that will enhance every bite of your knots.
- Brush Knots with Butter: As soon as the knots come out of the oven, use a pastry brush to generously coat them with the warm garlic-rosemary butter. Sprinkle lightly with ½ teaspoon kosher salt for added flavor. Brushing immediately ensures the butter soaks into the soft bread, creating a rich, flavorful crust that melts in your mouth.
- Serve and Enjoy: Transfer the garlic knots to a serving platter and allow them to cool slightly, or serve warm for maximum enjoyment. These soft, buttery, herb-infused knots are perfect as a side for pasta, soups, salads, or simply as a snack on their own. Store leftovers in an airtight container and gently reheat before serving.
Notes
- Make sure milk is warm, not hot, to avoid killing the yeast.
- Kneading the dough until smooth ensures soft, airy knots.
- Use a pizza cutter for even strips and uniform knots.
- Fresh rosemary adds the best flavor; dried can be used in a pinch.
- Brush the garlic-rosemary butter immediately after baking for maximum flavor absorption.
- Baking time may vary depending on oven, so monitor for a golden-brown color.
- Knots are best served warm but can be reheated gently for freshness.
Chef’s Secrets for Perfect Knots
The key to soft, flavorful garlic knots is in the dough and butter.
Ensure your yeast is active by letting it bubble in warm milk before combining with flour. Knead until smooth but not overly stiff—this creates a tender interior.
When shaping the knots, gently tuck the ends underneath; this helps them hold their shape while baking.
For the garlic butter, cook the garlic gently over low heat to release its aroma without burning.
Brushing the knots immediately after baking ensures the butter seeps into every crevice, giving them a rich, irresistible flavor.
Small adjustments, like using fresh herbs or high-quality butter, elevate the taste dramatically.
Serving Suggestions to Impress Guests
These garlic knots are incredibly versatile.
Serve them alongside Italian dishes like spaghetti, lasagna, or creamy risotto for a classic pairing.
They also work beautifully with soups, stews, or salads, adding a soft, buttery contrast to heartier dishes.
For a party or appetizer platter, arrange knots with a small bowl of marinara, pesto, or even herbed olive oil for dipping.
They can be enjoyed warm, straight from the oven, or at room temperature for casual gatherings, making them perfect for both weeknight dinners and entertaining.
Storage Tips for Long-Lasting Freshness
To keep your garlic knots fresh, store them in an airtight container at room temperature for up to 2 days.
For longer storage, place cooled knots in a freezer-safe bag or container and freeze for up to 2 months.
Reheat in a 350°F (175°C) oven for 5–10 minutes or until warmed through, brushing lightly with additional garlic butter if desired.
Avoid microwaving for long periods, as this can make the knots soggy.
Proper storage ensures they retain their soft, fluffy texture and delicious buttery flavor.
Frequently Asked Questions
1. Can I use dried rosemary instead of fresh?
Yes, you can substitute dried rosemary at half the quantity of fresh.
Dried herbs are more concentrated, so use sparingly to avoid overpowering the garlic flavor.
2. Can these knots be made ahead of time?
Absolutely! Shape the knots and refrigerate them overnight.
Allow them to come to room temperature before baking, or bake directly from the fridge, adding a few extra minutes to the baking time.
3. Are these garlic knots suitable for meal prep?
Yes, they make a great make-ahead option.
Bake in batches and store frozen.
Reheat as needed to pair with lunches, dinners, or soups throughout the week.
4. Can I use a different type of flour?
All-purpose flour gives the best soft, tender texture.
You can try bread flour for chewier knots or a gluten-free flour blend if needed, but the texture may be slightly different.
5. How do I prevent the garlic from burning in the butter?
Cook garlic over low heat in butter and stir frequently. Avoid high heat, which can quickly turn garlic bitter.
If using pre-minced garlic, reduce cooking time slightly to prevent burning.