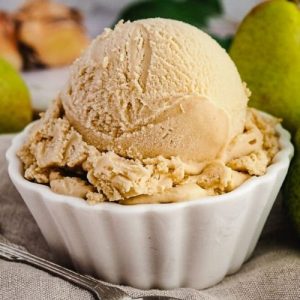
This homemade pear ice cream blends the natural sweetness of ripe pears with warming ginger and rich caramel notes, creating a decadent yet wholesome treat.
Packed with good fats from cream and naturally occurring fiber from pears, it’s a nutrient-conscious dessert.
Quick to prepare and perfect for chilling in advance, it’s ideal for everyday indulgence or meal prep.
Pear ice cream
Equipment
- Ice cream churner
- Skillet or frying pan
- Immersion/stick blender
- Deep-sided jug
- Small pot
- Mixing bowls
Ingredients
- 4 medium 750 g ripe pears
- ½ cup 110 g packed brown sugar
- 2 tablespoons 40 g unsalted butter
- 2 –3 teaspoons ground ginger
- 2 teaspoons 5 g tapioca starch
- 2 cups 500 ml thickened cream
- ½ tablespoon 15 g glucose syrup
Instructions
- Prepare the Pears: Start by peeling, coring, and dicing the ripe pears into small, uniform cubes. Using very ripe pears is essential for natural sweetness and a smooth texture. Place the diced pears in a large mixing bowl while you prepare the caramel base.
- Make the Caramel Base: In a medium skillet or frying pan, combine the unsalted butter and brown sugar over medium heat. Stir continuously until the butter melts completely and the sugar dissolves into a foamy, bubbling mixture. Watch carefully: the mixture should develop a light golden-brown color, which adds rich caramel notes, but avoid burning.
- Add Warm Spices: Sprinkle in the ground ginger and stir thoroughly, allowing the spice to bloom in the warm caramel. This step infuses the dessert with subtle, aromatic warmth that pairs beautifully with the sweet pears.
- Cook the Pears: Add the diced pears to the caramel-ginger mixture, stirring gently to coat each piece evenly. Cook for 2–3 minutes to soften the fruit and release their natural juices. Continue cooking for about 20 minutes, stirring frequently to prevent sticking. The pears should reduce into a thick, almost jam-like consistency.
- Cool and Puree the Pears: Remove the pan from heat and let the pear mixture cool slightly. Transfer the pears to a deep-sided jug or container suitable for an immersion blender. Blitz the mixture until smooth and creamy, then strain it through a fine sieve to remove any remaining fibrous bits. You should have approximately 1½ cups (375 ml) of smooth pear puree.
- Prepare the Cream Base: In a small pot, gently heat the thickened cream until warm but not boiling. In a separate small bowl, combine the tapioca starch with 2 tablespoons of cream to form a smooth slurry. Add the glucose syrup to the warm cream and stir until fully dissolved.
- Incorporate the Starch Slurry: Slowly whisk the tapioca starch slurry into the warm cream mixture. Continue stirring until the mixture thickens slightly, ensuring no lumps remain. If needed, briefly use an immersion blender to fully integrate the starch for a smooth, silky cream base.
- Combine Pear Puree and Cream: Pour the cooled pear puree into a large mixing bowl and gently fold in the cream mixture. Stir until the pear and cream are fully combined, resulting in a smooth, uniform custard. Cover the bowl and refrigerate for at least 4 hours, preferably overnight, to chill thoroughly and allow the flavors to meld.
- Prepare the Churning Equipment: Place your ice cream storage container in the freezer to pre-chill. If using a self-refrigerating ice cream churner, switch it on 10 minutes before churning. Otherwise, ensure your churner’s bowl is fully frozen to achieve the perfect soft-serve texture.
- Churn the Ice Cream: Pour the chilled pear-cream mixture into the ice cream churner and churn according to manufacturer instructions. The mixture will reach a soft-serve consistency once fully churned, creamy and light, with the rich caramelized pear flavor fully developed.
- Freeze Until Firm: Transfer the churned ice cream to a storage container, cover tightly, and freeze for at least 4 hours or until firm. This ensures a scoopable, perfectly set texture without ice crystals.
- Serve and Enjoy: Remove the ice cream from the freezer and allow it to soften slightly at room temperature for 5–10 minutes before scooping. Serve on its own for a rich, fruity dessert or pair with a homemade pear compote or a drizzle of caramel sauce. Enjoy the creamy, naturally sweet, and warmly spiced flavors in every bite!
Notes
- Use very ripe, juicy pears for maximum natural sweetness and smooth texture; Bartlett or Packham varieties work best.
- Measuring ingredients by weight ensures consistency, especially for the caramel and cream base.
- Don’t rush the caramel step: cook sugar and butter until golden, not burnt, for the richest flavor.
- The pear puree can be made ahead of time and stored in the fridge for up to 2 days.
- Chilling the cream mixture overnight allows flavors to meld and produces a creamier final texture.
- Soft-serve consistency is ideal when churning is complete; freezing further firms the ice cream without losing creaminess.
- For a slightly lighter version, reduce the cream by ½ cup and substitute with milk, keeping in mind the texture will be softer.
Chef’s Secrets For Perfect Texture
Achieving a creamy, smooth pear ice cream starts with both fruit selection and careful cooking.
Always use very ripe pears to ensure natural sweetness and a silky puree.
When cooking the caramel, watch it closely—golden-brown sugar adds depth, but overcooking creates bitterness.
Integrating the tapioca starch slurry slowly into the warm cream prevents lumps, giving the ice cream a luscious, velvety texture.
Chilling both the pear-cream mixture and the churner ensures a consistent, soft-serve-like consistency.
Small details like these make a world of difference, elevating the ice cream from ordinary to truly indulgent.
Serving Suggestions For Maximum Enjoyment
This pear ice cream is versatile and pairs beautifully with both simple and elaborate accompaniments.
Serve scoops on their own for a pure, fruity dessert.
For extra indulgence, drizzle with homemade caramel sauce or top with spiced nuts for texture contrast.
It also complements baked desserts like gingerbread, apple pie, or warm fruit tarts.
A dollop of lightly whipped cream and a sprinkle of cinnamon can elevate the presentation for dinner parties or festive gatherings.
For a fresh twist, pair with berries or a drizzle of honey.
Storage Tips For Fresh Ice Cream
Proper storage is key to maintaining the ice cream’s texture and flavor.
Always store in an airtight container to prevent ice crystals and freezer burn.
Freeze at least 4 hours after churning for firm texture.
For best results, let ice cream soften slightly at room temperature for 5–10 minutes before scooping.
Leftover ice cream can be stored for up to 2 weeks; beyond that, texture and flavor may degrade.
If the top layer forms ice crystals, gently stir with a chilled spoon before serving.
Frequently Asked Questions
1. Can I use other types of pears?
Yes, while Bartlett or Packham pears are ideal for sweetness and juiciness, you can use other ripe, soft pears.
Avoid underripe pears as they lack natural sweetness and may result in a gritty texture.
2. Is it possible to make this ice cream without a churner?
Absolutely. You can pour the chilled pear-cream mixture into a shallow container, freeze, and stir every 30–40 minutes until it reaches a creamy consistency. This mimics churning and helps reduce ice crystals.
3. Can I prepare the pear puree ahead of time?
Yes, the pear puree can be made up to 2 days in advance. Store it in a covered container in the refrigerator. Just ensure it is fully cooled before combining with the cream.
4. How do I prevent the ice cream from being too icy?
Chilling the cream mixture overnight and pre-chilling your churner are essential. Also, blending the pear puree thoroughly and straining ensures a smooth base.
Incorporating glucose syrup helps improve texture and reduces ice crystallization.
5. Can I make this ice cream vegan or dairy-free?
\Yes, you can substitute the thickened cream with full-fat coconut cream or another plant-based cream alternative.
The tapioca starch will still help thicken the mixture, but expect a slightly different mouthfeel and flavor.