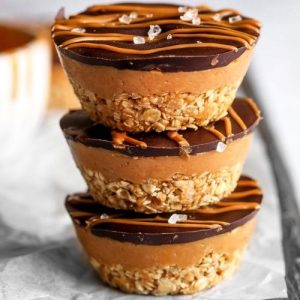
These Peanut Butter Chocolate Oat Cups are the perfect no-bake treat, blending creamy peanut butter with rich dark chocolate over a wholesome oat base.
Packed with plant-based protein, fiber, and healthy fats, they’re naturally vegan and gluten-free.
Quick, easy, and satisfying, they make an ideal snack or dessert for meal prep, busy days, or guilt-free indulgence.
Peanut Butter Chocolate Oat Cups
Equipment
- 1 Mixing Bowl
- 1 silicon muffin tray (6-cup)
- 1 Small bowl
- Spoon or spatula
- Microwave or double boiler for melting chocolate
Ingredients
For the Base:
- 70 g rolled oats use gluten-free if needed
- 2 tbsp smooth peanut butter or nut butter of choice
- 2 tbsp maple syrup
- Pinch of salt
For the Peanut Butter Layer:
- 100 g smooth peanut butter
- 1 tbsp maple syrup
For the Chocolate Topping:
- 70 g dark chocolate melted
- Optional: drizzle of melted Biscoff spread
Instructions
- Prepare the Base Ingredients: Start by gathering all ingredients for the oat base. In a medium-sized mixing bowl, combine rolled oats, smooth peanut butter, maple syrup, and a pinch of salt. Use a spoon or spatula to mix everything thoroughly until the oats are evenly coated, and the mixture becomes sticky enough to hold its shape when pressed. This will form the sturdy, flavorful foundation for your cups.
- Press the Base into Molds: Take a 6-cup silicon muffin tray and lightly grease it if needed, although silicone usually doesn’t stick. Divide the oat mixture evenly among the six cups. Using the back of a spoon or your fingers, firmly press the mixture down to create an even, compact layer. Ensuring the base is well-packed will help it hold together once chilled.
- Freeze the Base: Place the filled muffin tray in the freezer and allow it to set for 15 minutes. Freezing helps the oat layer firm up, making it easier to add the next layer without mixing or breaking the base. While waiting, you can prepare the peanut butter layer.
- Make the Peanut Butter Filling: In a small bowl, combine smooth peanut butter and maple syrup for the creamy middle layer. Stir until the mixture is smooth, uniform, and slightly glossy. Taste and adjust the sweetness if you prefer a sweeter filling. This layer adds a rich, indulgent flavor and a creamy texture that contrasts perfectly with the crunchy oat base.
- Add the Peanut Butter Layer: Once the oat base has firmed up, carefully spoon the peanut butter mixture over each base. Use a small spatula or the back of a spoon to spread it evenly, making sure it reaches all edges and sits neatly on top of the base. Smooth it out as much as possible to create a flat surface for the chocolate topping.
- Melt the Chocolate: Break dark chocolate into small pieces and melt it gently using a microwave in short bursts of 20–30 seconds, stirring in between, or use a double boiler on low heat. Stir frequently to prevent burning and achieve a glossy, smooth consistency.
- Top with Chocolate: Carefully pour or spoon the melted chocolate over the peanut butter layer, spreading it evenly so that it completely covers the peanut butter. If desired, drizzle a little melted Biscoff spread on top for extra flavor and a decorative finish. This chocolate layer adds richness and creates an attractive presentation.
- Chill Until Set: Place the tray back in the refrigerator for at least 20 minutes, or until the chocolate and peanut butter layers are firm to the touch. Chilling ensures the cups hold their shape and makes them easy to remove from the silicone tray without breaking.
- Serve and Enjoy: Once fully set, gently remove the cups from the silicone tray. Place them on a serving plate and enjoy immediately. These cups are perfect for a quick snack, dessert, or a treat to share with family and friends. Their combination of fiber-rich oats, protein-packed peanut butter, and antioxidant-rich dark chocolate makes them as satisfying as they are delicious.
- Optional Variations and Tips: For mini cups, use mini cupcake molds instead of a 6-cup tray. Alternatively, press the mixture into a loaf pan, refrigerate, and slice into squares for a slightly different presentation. You can also experiment with different nut butters or add a pinch of cinnamon or cocoa to the base for extra flavor.
Notes
- Use gluten-free rolled oats if you’re catering to gluten-sensitive diets.
- Smooth peanut butter works best for a creamy texture, but you can use almond, cashew, or sunflower seed butter for a different flavor.
- Ensure the oat base is firmly pressed into the muffin tray to prevent crumbling.
- Melting chocolate gently is key; avoid high heat to prevent burning and a grainy texture.
- Mini silicone molds are perfect for bite-sized snacks, while a loaf pan works well for portion-controlled squares.
- Optional toppings like a drizzle of Biscoff spread, crushed nuts, or shredded coconut add texture and visual appeal.
- These cups are naturally sweetened with maple syrup, but you can adjust to taste or use agave syrup for a different sweetness profile.
Chef’s Secrets To Perfect Cups
The secret to perfectly layered oat cups lies in texture contrast and gentle handling.
Firmly pressing the oat base ensures the cups hold together, while spreading the peanut butter layer evenly prevents mixing.
Melt chocolate slowly to achieve a smooth, glossy finish.
For added flavor, lightly toast the oats beforehand or add a pinch of cinnamon to the base.
Using silicone molds makes removal simple and prevents breakage. These small touches elevate both taste and presentation.
Serving Suggestions For Everyday Enjoyment
These oat cups are versatile and can be enjoyed in multiple ways.
Serve them chilled as a midday snack, a healthy dessert after dinner, or even as a pre-workout energy boost.
Pair with a hot cup of coffee, tea, or unsweetened plant-based milk for a balanced treat.
For special occasions, decorate with crushed nuts, cacao nibs, or a drizzle of caramel-style syrup to make them feel indulgent and festive.
Storage Tips To Maintain Freshness
To keep your oat cups at their best, store them in an airtight container in the refrigerator for up to one week.
Freezing is also an option—place them in a freezer-safe container for up to one month, separating layers with parchment paper to prevent sticking.
Thaw in the fridge for a few hours before serving.
Avoid leaving them at room temperature for long periods, as the chocolate topping may soften and affect the structure of the cups.
Frequently Asked Questions
1. Can I use crunchy peanut butter instead?
Yes, you can use crunchy peanut butter, but it will change the texture slightly.
The base may be a little chunkier, which can add a pleasant crunch but might make spreading the middle layer a bit more challenging.
2. Are these cups suitable for meal prep?
Absolutely! They’re ideal for meal prep because they hold well in the fridge and can be portioned in advance.
Perfect for snacks, lunchboxes, or dessert-ready options throughout the week.
3. Can I make these cups nut-free?
Yes, replace peanut butter with sunflower seed butter or soy nut butter.
Ensure all other ingredients, like chocolate, are also free from cross-contaminated nuts for a fully safe, nut-free version.
4. Can I sweeten them differently?
Maple syrup provides a natural, balanced sweetness, but you can use agave syrup, brown rice syrup, or even a little honey if not strictly vegan.
Adjust sweetness according to your taste.
5. How can I make the chocolate layer shiny and smooth?
The key is gentle, controlled melting. Use a double boiler or microwave in short bursts, stirring frequently.
Avoid overheating, which can cause chocolate to seize or become grainy. For extra shine, a small amount of coconut oil can be added while melting.