This extra-tangy sourdough bread delivers a perfect balance of bold flavor and wholesome nutrition.
Naturally fermented for a deep, mellow tang, it’s rich in fiber and plant-based protein while being low in saturated fat.
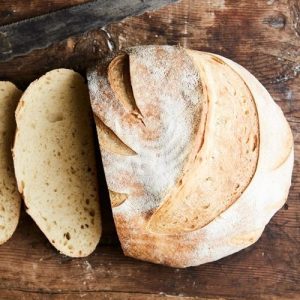
With a crusty exterior and soft, airy interior, this bread is an ideal everyday choice for sandwiches, meal prep, or simply enjoying with your favorite spreads.
Extra Tangy Sourdough Bread
Equipment
- 1 large mixing bowl
- 1 stand mixer with flat beater and dough hook attachments
- 1 2-quart dough rising container or bowl
- 1 baking sheet or parchment-lined tray
- 1 serrated bread knife or lame
- Optional: cast iron skillet, baking steel or stone, brotform baskets
Ingredients
- 1 cup 240 g active sourdough starter
- 1 1/2 cups 360 ml lukewarm water
- 3 cups 360 g all-purpose or bread flour
- 2 cups 240 g all-purpose or bread flour
- 2 teaspoons 12 g salt
- Optional: 1/2–5/8 teaspoon sour salt citric acid for extra tang
Instructions
- Activate the Starter and Mix Base: In a large mixing bowl or the bowl of a stand mixer, combine 1 cup (240 g) active sourdough starter with 1 1/2 cups (360 ml) lukewarm water. Stir gently until the starter dissolves and the mixture is slightly foamy. Gradually add 3 cups (360 g) flour, mixing with a flat beater attachment or wooden spoon until a rough, sticky dough forms. Beat or stir vigorously for about 1 minute to ensure the flour is fully hydrated.
- Rest and Ferment Overnight: Cover the bowl with a clean kitchen towel or plastic wrap. Let the dough rest at room temperature for 2–4 hours until it begins to expand. Then, refrigerate the dough overnight (approximately 12 hours) to develop a tangier, more complex flavor. During this time, the natural fermentation will create lactic and acetic acids that give the bread its signature taste. The dough will become more relaxed, airy, and easier to handle the next day.
- Incorporate Remaining Flour and Salt: Remove the dough from the refrigerator and let it come to room temperature for about 20–30 minutes. Sprinkle 2 cups (240 g) additional flour and 2 teaspoons (12 g) salt over the dough. Stir with a spatula or your hands until the ingredients are roughly combined. Transfer to a floured surface or use a stand mixer with a dough hook. Knead the dough for about 5 minutes until smooth, elastic, and slightly tacky, pulling away from the sides of the bowl. This strengthens the gluten network, ensuring the bread will rise evenly.
- Bulk Fermentation and Folding: Place the kneaded dough into a lightly greased container or a 2-quart dough rising bucket. Cover with a towel or lid. Allow the dough to rise at room temperature until it becomes airy and full of visible gas bubbles—this may take up to 6 hours, depending on your starter’s activity and ambient temperature. Every hour, perform a gentle stretch-and-fold: Lift one side of the dough, stretch it upward, fold it toward the center, then rotate the dough and repeat until all edges are folded in. Flip the dough smooth-side up. This folding technique strengthens the dough’s structure and improves its final texture.
- Preshape the Dough: Lightly flour your work surface. Turn the dough out and gently divide it in half, about 585 g each. Gently pat each portion to release large air bubbles without deflating it completely. To create a loose round, pull the edges outward and fold them back toward the center, pressing gently to seal. Repeat this folding around the dough until all edges meet in the center. Flip the dough so the seam is down and cover with a towel. Let it rest for about 10 minutes to relax the gluten before final shaping.
- Shape into Bâtards: Transfer the rested dough to a lightly floured surface. Gently stretch the dough into an oval shape. Pat lightly to remove any remaining air pockets. Fold the top third down toward the center, like folding a letter, and press gently to seal. Fold the corners in at a 45° angle, pressing to seal again. Repeat this folding once more, then fold the dough in half lengthwise, pressing along the seam to ensure a tight, well-structured loaf.
- Final Rounding and Tapering: Turn the shaped dough over, seam-side down. Using cupped hands, roll it gently back and forth, keeping your fingertips lightly in contact with the surface. Apply slightly more pressure toward the edges to taper them subtly while rounding the loaf. This creates an even, aesthetically pleasing bâtard shape and ensures uniform baking.
- Prepare for Proofing: Place the shaped loaves on a lightly greased or parchment-lined baking sheet. Alternatively, dust a brotform basket with flour and place the dough seam-side up for a rustic finish. Cover loosely and let the dough proof at room temperature until very puffy, about 2–4 hours. For a slower, deeper flavor, you can refrigerate the dough overnight at this stage. Don’t worry if the dough spreads slightly rather than rising dramatically; it will spring up in the oven.
- Preheat Oven and Steam Setup: Toward the end of proofing, preheat your oven to 425°F (220°C). For a crisp, golden crust, preheat a baking steel or stone in the center of the oven. Place a cast iron skillet on the lower rack (not directly under the bread). Just before baking, pour 1 cup water into the skillet or use a covered baking shell to generate steam, which helps the crust develop a beautiful crunch while keeping the interior soft.
- Score the Loaves: Lightly mist or brush the bâtards with lukewarm water to keep the surface pliable. Using a serrated bread knife or a lame, slash the loaves with deep, deliberate cuts: one long cut down the center, two diagonal cuts, or a symmetrical pattern of your choice. Proper scoring allows controlled expansion and adds an artisan appearance.
- Bake to Perfection: Place the loaves in the oven. Bake for 25–30 minutes, until the crust turns a deep golden brown. If using a baking shell, remove it after 15 minutes to allow full crust development. Rotate the tray if needed for even browning. The bread should sound hollow when tapped on the bottom, signaling a fully baked interior.
- Cooling and Storing: Transfer the baked loaves to a wire rack and let them cool completely before slicing. Cooling prevents a gummy interior and allows flavors to fully develop. Store the bread loosely wrapped at room temperature for several days, or freeze for longer-term storage. For best texture, slice fresh before serving.
- Serving Suggestions: Enjoy your tangy sourdough as sandwiches, toast, or with olive oil, fresh herbs, or sun-dried tomatoes. The rich, complex flavor pairs beautifully with both savory spreads and soft cheeses.
Notes
- Using a refrigerated starter enhances the tangy flavor, thanks to increased acetic acid production.
- Folding the dough during bulk fermentation strengthens gluten and improves texture without heavy kneading.
- Preshaping and final shaping ensure even crumb structure and a beautiful loaf shape.
- Scoring the loaves properly allows controlled expansion in the oven and creates an artisan look.
- Adding steam during baking produces a crisp, glossy crust while keeping the interior soft and tender.
- The dough can be refrigerated for extended fermentation, which deepens flavor and allows flexible baking schedules.
- Optional citric acid can boost tanginess without affecting texture.
- Loaves freeze well when wrapped tightly; slice before freezing for convenient, ready-to-toast portions.
Chef’s Secrets for Perfect Sourdough
Creating a truly remarkable sourdough loaf is about patience and technique.
Using a well-fed, active starter ensures the dough rises evenly and develops the characteristic tang.
Folding the dough during bulk fermentation strengthens its gluten network, allowing for an airy, chewy interior.
For a crisp, crackly crust, introducing steam during baking is essential—it keeps the surface flexible at first, allowing the loaf to expand fully before hardening.
Preheating a baking stone or steel not only ensures even heat distribution but also mimics a professional bakery environment at home.
Finally, don’t rush cooling; letting the bread rest after baking prevents a gummy texture and allows flavor to mature.
Serving Suggestions for Maximum Enjoyment
This tangy sourdough is versatile enough to be served in a variety of ways.
Slice it thick for hearty sandwiches with roasted vegetables, cheeses, or cured meats.
Lightly toast slices and spread with avocado, olive oil, or nut butter for a nutritious breakfast.
For a gourmet twist, top with oven-roasted tomatoes, fresh basil, or sun-dried tomato tapenade.
Its firm crust and soft, airy interior also make it perfect for dipping into soups, stews, or olive oil and balsamic vinegar for a simple yet satisfying snack.
Storage Tips for Long-Lasting Freshness
Sourdough keeps best when stored loosely wrapped at room temperature, allowing the crust to remain crisp while the crumb stays soft.
Avoid airtight containers at room temperature, as trapped moisture can lead to a chewy or moldy loaf.
For longer storage, freeze the bread after cooling, ideally sliced for convenience.
When ready to eat, toast slices straight from the freezer or thaw them at room temperature to retain the bread’s natural texture.
Refrigeration is generally not recommended, as it can dry out the loaf and reduce the desirable crumb softness.
Frequently Asked Questions
1. How do I know if my starter is active?
A healthy starter should double in size within 4–6 hours of feeding, produce bubbles throughout, and have a pleasant, slightly tangy aroma.
If it sinks quickly or lacks bubbles, it may need a few more feedings to reach full strength.
2. Can I make this bread without a sourdough starter?
Yes! You can substitute with commercial yeast for faster results.
Use about 1 teaspoon of active dry yeast along with the first mix of flour and water, but keep in mind that the tangy depth of flavor will be reduced compared to traditional sourdough.
3. Why is steam important during baking?
Steam keeps the outer crust flexible during the first part of baking, allowing the loaf to expand fully without cracking.
It also contributes to a glossy, crackly crust and prevents the interior from drying out prematurely.
4. How do I get a more pronounced tangy flavor?
Extended fermentation in the refrigerator enhances the tang.
Additionally, adding 1/2–5/8 teaspoon of citric acid (sour salt) with the salt in the dough can intensify the acidity for those who prefer a sharper taste.
5. Can I prepare the dough in advance for flexible baking?
Absolutely. After shaping, the dough can be refrigerated overnight or up to 24 hours.
This slow proofing improves flavor and allows you to bake fresh bread at your convenience without compromising texture or taste.