Experience the joy of soft, fluffy bread rolls made with rich condensed milk and a touch of butter.
These homemade rolls are delightfully tender, lightly sweet, and packed with comforting flavor.
With moderate protein, fiber, and good fats, they make a nourishing snack or breakfast option.
Quick to prepare and perfect for everyday baking, they are ideal for family meals, lunchboxes, or cozy tea-time treats.
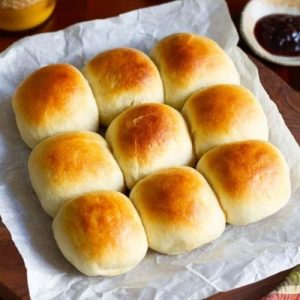
Condensed Milk Bread Rolls
Equipment
- Small mixing bowl – 1
- Stand mixer with dough hook – 1
- Spatula (1)
- Kitchen towel – 1
- 9"x9" square baking pan – 1
- Parchment paper (1 sheet)
- Pastry brush – 1
Ingredients
- 2/3 cup lukewarm milk
- 2 tsp active dry yeast
- 2.5 cups all-purpose flour
- 2 tsp granulated sugar
- 1/4 cup sweetened condensed milk
- 4 tbsp softened butter preferably salted
- 1.5 tbsp milk for brushing
- Butter for brushing baked rolls
Instructions
- Activate Yeast: In a small bowl, pour the lukewarm milk and sprinkle in the active dry yeast along with a pinch of sugar. Gently stir the mixture until fully combined. Let it sit undisturbed for 5–10 minutes, allowing the yeast to bloom and form a frothy, bubbly surface. This step ensures the yeast is active and ready to make your rolls light and airy.
- Prepare Dough Base: In the bowl of your stand mixer, combine the all-purpose flour, granulated sugar, sweetened condensed milk, and softened butter. Mix gently with a spatula until the ingredients are partially incorporated, forming a scraggy dough. The butter may appear clumpy, but it will blend during kneading.
- Combine Wet Ingredients: Pour the activated yeast mixture into the flour and butter mixture. Using the spatula, fold the wet and dry ingredients together until the dough starts to come together. It will still look slightly rough and sticky at this stage—this is normal and expected.
- Initial Rest: Cover the dough loosely with a clean kitchen towel and let it rest for 15–20 minutes. This brief resting period allows the flour to absorb the liquids fully, softening the dough and making kneading easier.
- Knead the Dough: Attach the dough hook to your stand mixer. Start kneading the dough on a slow speed for 3–4 minutes to bring it together. Gradually increase the speed to medium-high and continue kneading for an additional 10–12 minutes. The dough should become smooth, soft, slightly sticky, and elastic, pulling away cleanly from the sides of the bowl.
- First Proofing: Lightly oil a clean bowl and transfer the kneaded dough into it. Cover with a damp kitchen towel or plastic wrap and place in a warm, draft-free area. Allow the dough to rise for approximately 60 minutes or until it doubles in size. This slow fermentation develops flavor and ensures soft, fluffy rolls.
- Prepare Pan: While the dough rises, line a 9"x9" square baking pan with parchment paper. Ensure the paper extends slightly above the edges for easy removal of the rolls after baking.
- Deflate and Shape Dough: Once the dough has doubled, gently punch it down to release any trapped air. Transfer it onto a lightly floured work surface and shape it into a smooth log.
- Divide and Roll: Using a sharp knife or bench scraper, cut the dough into nine equal portions (about 76–77 grams each). Roll each portion into a smooth, tight ball by cupping your hands around it and gently rotating on the surface. Place the dough balls evenly in the prepared pan, leaving a little space between each.
- Second Proofing: Cover the shaped rolls with a damp kitchen towel. Let them proof for 30–45 minutes, or until they appear puffy and have increased in size noticeably. This final rise ensures light, tender rolls with a delicate crumb.
- Preheat Oven: While the rolls are proofing, preheat your oven to 200°C (392°F). Ensure the oven reaches the correct temperature before baking to guarantee even browning.
- Brush and Bake: Once proofed, gently brush the tops of the rolls with milk. This helps create a subtle sheen and promotes a golden-brown crust. Place the pan in the preheated oven and bake for 20–25 minutes, or until the tops turn a beautiful golden brown.
- Final Butter Glaze: Remove the hot rolls from the oven. While still warm, brush generously with butter to enhance flavor, keep the crust soft, and add a glossy finish. Allow the rolls to cool slightly before serving.
- Serve and Enjoy: These rolls are best enjoyed warm, fresh from the oven. They pair wonderfully with butter, jam, or even a light soup or salad. Store any leftovers in an airtight container to maintain softness.
Notes
- Always use lukewarm milk to activate the yeast properly; avoid water that is too hot or too cold.
- Ensure the butter is softened but not melted to achieve the right dough texture.
- Use a kitchen scale when dividing dough for evenly sized rolls and consistent baking.
- Let the dough double in size during the first proofing for a light, airy crumb.
- Gently roll dough balls to preserve fermentation bubbles, which help the rolls rise evenly.
- Brushing rolls with milk before baking adds a subtle sheen.
- Brush baked rolls with butter immediately for a soft crust and enhanced flavor.
- Avoid refrigerating rolls, as it can dry them out; store at room temperature or freeze for longer keeping.
Chef’s Secrets For Perfect Rolls
Achieving bakery-quality rolls at home is all about technique and timing.
Knead the dough thoroughly for a smooth, elastic texture—this develops gluten, giving rolls their pillowy structure.
Don’t rush proofing; letting the dough double in size creates a light, airy crumb.
When shaping, roll gently to preserve the gas bubbles from fermentation, which help the rolls rise evenly.
Using sweetened condensed milk not only adds flavor but also tenderizes the dough, keeping it moist longer.
For a golden, soft crust, brushing with butter while the rolls are still hot is essential.
Serving Suggestions For Maximum Enjoyment
These rolls are incredibly versatile.
Serve them warm with a pat of butter or a drizzle of honey for breakfast or brunch.
They also pair beautifully with soups, stews, or creamy pasta dishes for a comforting meal.
For a sweet twist, add a sprinkle of powdered sugar or a spread of jam.
They make excellent lunchbox treats or snacks and can be split to create mini sandwiches with cheese, deli meats, or avocado.
Their soft, tender texture complements both sweet and savory flavors effortlessly.
Storage Tips To Keep Fresh
To maintain softness, store cooled rolls in an airtight container at room temperature for up to 2–3 days.
For longer storage, wrap them tightly in plastic wrap or foil and freeze for up to 1 month.
When ready to serve, reheat frozen rolls in a preheated oven at 160°C (320°F) for 5–10 minutes or microwave briefly with a damp paper towel to restore moisture.
Avoid refrigerating, as it can dry out the rolls and make them less tender.
Frequently Asked Questions
1. Can I make these rolls without a stand mixer?
Yes! You can knead the dough by hand. It will take slightly longer—about 15–20 minutes—but the results will be just as soft and fluffy.
Use a large bowl and work on a lightly floured surface for best results.
2. Can I use whole milk instead of lukewarm milk?
Absolutely. The key is to ensure the milk is lukewarm (around 105–110°F / 40–43°C) to activate the yeast.
Cold milk will slow fermentation, while hot milk may kill the yeast.
3. Are these rolls egg-free?
Yes, this recipe is naturally eggless.
The condensed milk provides sweetness and moisture, making them soft and tender without the need for eggs.
4. Can I make smaller or larger rolls?
Yes, simply adjust the size of each dough portion.
Keep in mind that smaller rolls will bake faster, so check them a few minutes earlier, while larger rolls may need a longer bake time to achieve a golden brown top.
5. How can I make these rolls fluffier?
Ensure the dough is kneaded thoroughly and allowed to proof fully.
Avoid over-handling after the first rise, and don’t skip the second proofing.
Also, using slightly warm, draft-free conditions for proofing helps the rolls rise beautifully.