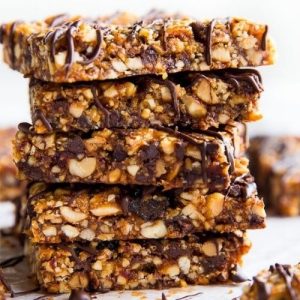
These Chocolate Peanut Butter Snack Bars are the perfect balance of sweet, salty, and satisfying.
Packed with plant-based protein, fiber from nuts and dates, and healthy fats, they offer long-lasting energy without refined sugars or heavy carbs.
Naturally gluten-free and grain-free, they make a wholesome grab-and-go snack or light dessert.
Quick to prepare, meal-prep friendly, and deliciously drizzled with chocolate, they’re a guilt-free treat everyone will love.
Chocolate Peanut Butter Snack Bars
Equipment
- 1 (8-inch or 9-inch) square baking pan
- Parchment paper (enough to line with overhang)
- 1 medium glass mixing bowl
- 1 silicone spatula
- 1 Cooling Rack
- Measuring Cups and Spoons
Ingredients
- ⅓ cup 113 g honey or brown rice syrup
- ⅓ cup 37 g almond meal or almond flour
- 1 tablespoon 15 g peanut butter (or any nut butter)
- ½ teaspoon pure vanilla extract
- 2 cups 300 g salted peanuts, roughly chopped
- 5 Medjool dates roughly chopped
- ⅓ cup 60 g mini chocolate chips
- Optional: 4 oz melted semi-sweet chocolate for drizzling
Instructions
- Prepare the Baking Pan: Begin by preheating your oven to 300°F (149°C). While the oven heats, line an 8-inch or 9-inch square baking pan with parchment paper. Make sure to leave a few inches of overhang on two opposite sides—this will act as handles later, making it easy to lift the finished bars out in one piece. Press the parchment flat against the edges so it fits snugly into the corners. Set the pan aside.
- Mix the Binding Base: In a medium-sized mixing bowl, add the honey (or brown rice syrup), almond meal, peanut butter, and vanilla extract. Use a silicone spatula or sturdy spoon to stir the mixture together until it becomes smooth and sticky. This will form the “glue” that holds the bars together, so ensure all ingredients are evenly combined without dry patches.
- Incorporate Crunch and Sweetness: Fold in the chopped peanuts, dates, and mini chocolate chips. Stir thoroughly, ensuring the sticky mixture coats every nut and piece of fruit. The goal is to distribute the sweet dates and chocolate chips throughout the bars, so every bite has a balanced mix of flavors and textures. If the mixture feels too dry, press with the back of your spatula to help bind everything together.
- Transfer and Press Firmly: Spoon the mixture into the prepared baking pan. Using a spatula, press it into an even layer across the bottom. For best results, place a small piece of parchment on top and press down firmly with your hands or the flat bottom of a measuring cup. This step is crucial—packing the mixture tightly ensures the bars hold their shape once baked.
- Bake Until Lightly Golden: Slide the pan into the preheated oven and bake for 20–22 minutes. The bars are ready when the edges appear slightly golden brown but not overly dark. Baking helps set the mixture, melt the chocolate chips slightly, and intensify the nutty flavors. Remove the pan from the oven and place it on a cooling rack.
- Cool Completely Before Chilling: Allow the bars to cool fully in the pan for at least 1 hour at room temperature. Do not rush this step—cutting too early may cause the bars to crumble. Cooling allows the mixture to firm up gradually and prevents condensation during refrigeration.
- Chill for Perfect Texture: Once cooled, transfer the entire pan to the refrigerator for at least 1 additional hour. This final chilling step is what makes the bars compact, chewy, and easy to slice without falling apart.
- Remove and Slice Neatly: After chilling, lift the parchment paper overhang to remove the slab of bars from the pan. Place it on a cutting board and use a sharp knife to slice into 9 large squares or 12 slim rectangles, depending on your preference. For clean cuts, wipe the knife between slices.
- Optional Chocolate Drizzle: For extra indulgence, melt about 4 ounces of semi-sweet chocolate in a microwave-safe bowl or using a double boiler. Drizzle it generously over the cut bars, either before serving or after cutting. Allow the chocolate to set before wrapping or storing.
- Store and Enjoy Anytime: Individually wrap each bar in plastic wrap or parchment paper for easy grab-and-go snacking. Store at room temperature for up to 1 week or in the refrigerator for up to 2 weeks. If you prefer longer storage, freeze them for up to 3 months and thaw before enjoying.
Notes
- Natural Sweeteners: Honey or brown rice syrup provide both sweetness and structure—avoid thinner liquids like maple syrup or agave.
- Nut Base: Almond meal or almond flour works as a binder. You can also pulse raw almonds in a food processor until crumbly.
- Crunch Factor: Salted peanuts add a sweet-and-salty contrast. If using unsalted peanuts, add a pinch (about ⅛ teaspoon) of salt.
- Chocolate Boost: Mini chocolate chips distribute more evenly than regular-sized chips, giving chocolate in every bite.
- Firm Texture: Pressing the mixture tightly into the pan is essential to prevent crumbling.
- Chill Time: Cooling at room temperature followed by refrigeration makes the bars compact and easy to slice.
- Optional Drizzle: A layer of melted chocolate drizzle adds a dessert-like finish, but the bars are delicious without it.
- Storage Friendly: Bars stay fresh for 1 week at room temperature, 2 weeks refrigerated, and 3 months frozen.
Chef’s Secrets for Perfect Results
The secret to achieving bars that hold their shape lies in how firmly the mixture is pressed into the pan.
Use the bottom of a measuring cup or flat glass wrapped in parchment to really compact the mixture before baking—it should feel tight and even.
Another pro tip is to chop the peanuts and dates into small, consistent pieces so they distribute evenly, preventing weak spots that might cause crumbling.
If you’re a fan of stronger peanut butter flavor, you can add an extra tablespoon without altering the texture.
Finally, a short chill in the refrigerator after cooling isn’t optional—it’s what transforms these bars from soft and fragile to chewy and firm.
Serving Suggestions for Any Occasion
These bars are versatile enough to fit into almost any part of your day.
Slice them into squares for a quick afternoon pick-me-up with tea or coffee, or cut them into slimmer rectangles for lunchbox-friendly snacks.
They also double as a light dessert, especially when topped with a drizzle of melted chocolate and a sprinkle of flaky sea salt.
For a protein-packed breakfast option, pair one bar with Greek yogurt or a smoothie.
If you’re hosting, arrange them on a platter alongside fresh fruit and nuts for a healthier alternative to traditional sweets.
Storage Tips to Keep Them Fresh
Proper storage ensures these bars stay deliciously chewy and compact.
At room temperature, they’ll last for about a week, though they may become slightly sticky after a few days.
To keep them fresher for longer, store them in an airtight container in the refrigerator, where they’ll stay firm for up to two weeks.
If you want to meal prep in bulk, wrap each bar individually in parchment or plastic wrap, place them in a freezer-safe bag, and store for up to three months.
Thaw overnight in the fridge or for an hour at room temperature before enjoying.
Frequently Asked Questions
1. Can I make these bars nut-free?
Yes! Swap the peanuts for roasted sunflower seeds or pumpkin seeds, and replace peanut butter with sunflower seed butter.
The bars will still hold together beautifully while remaining nut-free.
2. Can I skip the chocolate chips?
Absolutely. The dates already provide natural sweetness, so you can omit the chocolate chips or replace them with dried fruit such as cranberries or raisins for a chewy twist.
3. What can I use instead of almond meal?
You can substitute oat flour, ground sunflower seeds, or finely ground coconut flakes.
Just ensure the replacement has a dry, flour-like texture to bind the mixture without adding excess moisture.
4. Do I need to bake the bars?
Baking helps the bars firm up and develop a lightly toasted flavor, but if you prefer a no-bake option, you can skip the oven step.
In that case, increase the chilling time to at least 3 hours to allow them to set.
5. Why are my bars falling apart?
This usually happens if the mixture wasn’t pressed firmly enough into the pan or if cooling and chilling steps were rushed.
Always pack the mixture down tightly and allow full cooling at room temperature followed by refrigeration for best texture.