Indulge in a creamy, rich chocolate ice cream infused with the natural sweetness of honey and the nutty depth of almond butter.
Packed with protein from egg yolks and healthy fats from almond butter, this dessert is both satisfying and nutritious.
Quick to prepare and perfect for everyday treats, it’s a wholesome way to enjoy a decadent frozen dessert without relying on refined sugar.
Chocolate Chunk Ice Cream
Equipment
- 1 heavy saucepan
- 1 Whisk
- 1 Fine mesh strainer
- 1 Ice Cream Maker
- 1 double boiler (or heatproof bowl + saucepan)
- 1 Freezer-safe container
Ingredients
- 1 ½ cups whole milk
- 1 cup heavy cream
- 4 large egg yolks
- ⅛ teaspoon orange zest
- ⅔ cup wildflower honey
- ½ cup almond butter
- ⅛ teaspoon almond extract
- ¼ cup dark chocolate avoid chocolate chips
Instructions
- Warm the Dairy Base: Pour the whole milk and heavy cream into a medium, heavy-bottomed saucepan. Add the orange zest to infuse a subtle citrus aroma. Place the saucepan over low heat and gently warm the mixture until it begins to shimmer and tiny bubbles form along the edges, just before a full simmer. Avoid boiling, as this can curdle the milk. Once warmed, remove from the heat and let it rest for 3 minutes to allow the flavors to meld.
- Strain the Zest for Smoothness: Using a fine mesh strainer, carefully pour the milk and cream mixture into a clean bowl to remove the orange zest. Press lightly on the solids to extract any flavorful milk remaining in the zest. This ensures a silky, smooth custard without any fibrous bits.
- Combine Eggs and Dairy: In the same saucepan, whisk together the egg yolks until smooth and slightly pale. Slowly pour the warm milk and cream into the egg yolks in a thin stream, whisking constantly to prevent the eggs from scrambling. Once fully combined, return the mixture to low heat, stirring gently but continuously with a heatproof spatula or wooden spoon.
- Cook the Custard: Cook the egg and dairy mixture over low heat for 5–7 minutes, stirring constantly. Focus on even heat distribution, making sure to scrape the bottom and edges of the pan. You’re looking for a custard that thickens enough to coat the back of a spoon—when you run your finger across it, it should leave a clear line. Avoid boiling, which can cause separation or curdling.
- Add Sweetness and Flavor: Once the custard reaches the perfect thickness, remove it from heat. Immediately stir in the wildflower honey for natural sweetness, the almond butter for rich nutty depth, and the almond extract for a fragrant finish. Whisk thoroughly until all ingredients are fully incorporated and the custard is smooth and glossy.
- Chill the Custard: Transfer the custard to a clean bowl and cover loosely. Place it in the refrigerator, uncovered, and allow it to chill completely. Chilling for at least 2–3 hours ensures the custard is cold enough for proper churning and helps the flavors to fully develop.
- Prepare the Chocolate Chunks: While the custard is chilling, break the dark chocolate into small pieces. Set up a double boiler by placing a heatproof bowl over a saucepan of gently simmering water, making sure the bowl doesn’t touch the water. Melt the chocolate slowly, stirring occasionally until smooth. Remove from heat and set aside to cool slightly. This will be drizzled into the ice cream later.
- Churn the Ice Cream: Once the custard is thoroughly chilled, pour it into your ice cream maker according to the manufacturer’s instructions. Turn the machine on and let it churn. After about 10 minutes, when the mixture is starting to thicken but is not yet firm, slowly drizzle in the melted chocolate. The churning motion will create luscious chocolate ribbons throughout the ice cream.
- Freeze Until Firm: When the ice cream reaches the desired soft-serve consistency in the ice cream maker, transfer it immediately to a freezer-safe container. Smooth the top with a spatula, cover tightly, and freeze for at least 2–3 hours to allow it to firm up to scoopable perfection.
- Serve and Enjoy: Before serving, allow the ice cream to sit at room temperature for 3–5 minutes to soften slightly for easier scooping. Serve in bowls or cones, and enjoy the creamy, honey-sweetened base studded with rich chocolate chunks. Store any leftovers in the freezer for up to two weeks, ensuring the lid is tightly sealed to maintain texture and flavor.
Notes
- Use high-quality, fresh ingredients for the best flavor and texture.
- Choose pasture-raised eggs to achieve a richer, creamier custard.
- Select dark chocolate with at least 60% cocoa for deep, indulgent flavor.
- Use smooth, natural almond butter without added sugar or oils to maintain silkiness.
- Chill the custard thoroughly before churning to prevent icy crystals.
- Whisk continuously while cooking the custard to ensure a velvety texture.
- Melt chocolate slowly over a double boiler to avoid burning and preserve smoothness.
- Freeze in a tightly sealed container for optimal creaminess and to prevent freezer burn.
Chef’s Secrets: Secrets For Perfect Texture
The secret to ultra-creamy ice cream lies in balancing heat and time.
Warm the milk and cream gently and cook the custard slowly to avoid scrambling the yolks. Whisk continuously to create a silky, velvety base.
Drizzling slightly cooled melted chocolate into the churning ice cream rather than stirring it in afterward produces beautiful ribbons that set perfectly.
For added richness, let the ice cream rest in the freezer for several hours before serving, allowing flavors to meld fully.
Serving Suggestions: Creative Ways To Serve
Serve this ice cream on its own in a bowl for a simple indulgence or pair it with fresh berries, roasted nuts, or a drizzle of honey for a sophisticated twist.
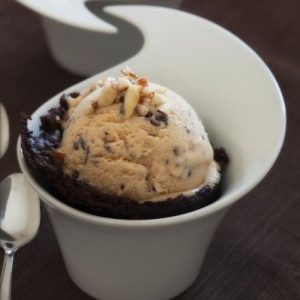
It also works beautifully as a topping for warm brownies, chocolate cake, or apple crisp.
For an elegant presentation, scoop into martini glasses and garnish with a few chocolate shavings or toasted almond slices.
This ice cream is versatile enough to complement casual snacks or a special dessert spread.
Storage Tips: Keep Ice Cream Fresh Longer
Store your ice cream in a tightly sealed, freezer-safe container to prevent ice crystals and maintain smoothness.
Place a piece of parchment or plastic wrap directly on the surface before sealing the lid to minimize freezer burn.
Keep it in the coldest part of the freezer, away from the door, for the best texture.
Homemade ice cream is best enjoyed within two weeks, but properly stored, it can last up to one month while still retaining creamy consistency.
Frequently Asked Questions
1. Can I substitute almond butter?
Yes! Cashew butter or sunflower seed butter can be used for a similar creamy texture and nutty flavor.
Avoid peanut butter, as it can overpower the delicate sweetness of the honey.
2. Can I make this ice cream without an ice cream maker?
Absolutely. Freeze the custard in a shallow dish, stirring every 30 minutes for 2–3 hours to break up ice crystals until smooth.
It won’t have the exact churning texture but will still be creamy and delicious.
3. Is honey necessary, or can I use sugar?
Honey provides natural sweetness and a subtle floral depth that sugar cannot replicate.
If needed, you can substitute with granulated sugar, but the flavor will be slightly less nuanced.
4. How do I get the chocolate chunks to distribute evenly?
Drizzling melted chocolate while the ice cream churns ensures thin ribbons that set evenly.
For chunkier pieces, gently fold in finely chopped chocolate after churning for uniform distribution.
5. Can I make this recipe ahead for parties?
Yes! This ice cream is perfect for advance preparation. Make it a day or two ahead and freeze until serving.
Just allow a few minutes at room temperature before scooping for the perfect soft-serve texture.