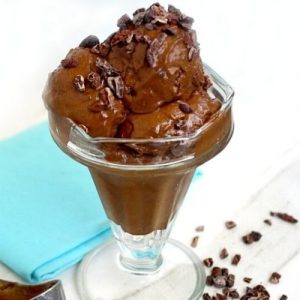
Indulge in a creamy, refreshing treat with this Gluten-Free Vegan Cacao Nib and Mint Chocolate Ice Cream.
Packed with plant-based protein from cashews and fiber from cacao nibs, it’s a guilt-free dessert brimming with good fats and natural sweetness.
Quick and simple to make, it’s perfect for satisfying chocolate cravings, meal-prep-friendly, and a wholesome option for everyday enjoyment without refined sugar or dairy.
Cacao Nib & Mint Chocolate Ice Cream
Equipment
- 1 Vitamix or high-speed blender
- 1 Ice Cream Maker or ice pop molds
- Air-tight freezer-safe container for storage
Ingredients
For the Ice Cream Base:
- 1 cup raw cashews soaked if needed
- 1 can 13.5 oz full-fat coconut milk
- ¼ cup raw cacao powder
- ½ cup coconut sugar
- ½ teaspoon pure vanilla extract
- 2 teaspoons peppermint extract
- 1 pinch Himalayan pink salt
Add-In:
- ½ cup cacao nibs
Instructions
- Prepare Cashews for Creaminess: If your cashews are raw and unsoaked, place them in a bowl of warm water for at least 2–4 hours or overnight to soften. Soaking helps achieve a smoother, creamier texture in the ice cream. After soaking, drain and rinse the cashews thoroughly to remove excess starch. This step ensures your ice cream base is luxuriously creamy and silky.
- Blend Base Ingredients Thoroughly: In a high-speed blender or Vitamix, combine the soaked cashews, full-fat coconut milk, raw cacao powder, coconut sugar, vanilla extract, peppermint extract, and a pinch of Himalayan pink salt. Blend on high speed for 2–3 minutes, or until the mixture is completely smooth and homogenous. Stop occasionally to scrape down the sides to ensure no lumps remain. This process creates a rich, velvety chocolate-mint base.
- Taste and Adjust Flavor: Before moving to freezing, taste the mixture. If you want a stronger mint flavor, carefully add a few more drops of peppermint extract. If it’s not sweet enough for your liking, you can add a little extra coconut sugar. Blending and adjusting at this stage ensures that your ice cream will have balanced flavor once frozen.
- Fold in Cacao Nibs: Using a spatula, gently fold the cacao nibs into the blended ice cream base. Stir until the cacao nibs are evenly distributed throughout the mixture. These crunchy nibs provide a delightful contrast to the creamy ice cream, adding both texture and a subtle chocolate intensity.
- Transfer to Ice Cream Maker or Molds: Pour the mixture into your ice cream maker and follow the manufacturer’s instructions for churning until the ice cream reaches a soft-serve consistency. Alternatively, if using ice pop molds, pour the mixture evenly into each mold. Tap gently to remove air bubbles and ensure the mixture is evenly distributed.
- Freeze Until Firm: Once churned, transfer the soft ice cream to an air-tight, freezer-safe container if using the ice cream maker. Smooth the top with a spatula, cover with a lid, and freeze for at least 4–6 hours, or until fully set. For ice pop molds, insert sticks if applicable, cover, and freeze until solid, usually 4–6 hours. This step is crucial for achieving the perfect scoopable texture.
- Serve and Enjoy: Before serving, allow the ice cream to sit at room temperature for 5–10 minutes to soften slightly for easier scooping. Serve in bowls, cones, or enjoy straight from the mold. You can optionally garnish with extra cacao nibs, shaved dark chocolate, or a few fresh mint leaves for a beautiful presentation.
- Storage Tips for Longevity: Store leftovers in an air-tight container in the freezer. To prevent ice crystals from forming, press a piece of parchment paper directly on the surface of the ice cream before sealing. Properly stored, this ice cream will maintain its creamy texture for up to 2 weeks.
Notes
- Cashew Preparation: Soaking cashews is optional but highly recommended for a smoother, creamier ice cream base. If pressed for time, you can use raw cashews without soaking, though the texture may be slightly less silky.
- Coconut Sugar Substitutes: Feel free to swap coconut sugar with maple syrup, agave, or another unrefined sweetener. Adjust sweetness to taste.
- Peppermint Flavor Variation: The peppermint extract can be reduced or omitted for a plain chocolate ice cream. You can also experiment with other extracts such as almond or orange for a unique twist.
- Cacao Nibs Alternatives: Vegan mini chocolate chips or finely chopped dark chocolate can be used in place of cacao nibs for a softer chocolate texture.
- Ice Cream Molds vs. Maker: This recipe works well in both traditional ice cream makers and ice pop molds. For pops, expect 6 individual treats per batch.
Chef’s Secrets To Perfect Ice Cream
Achieving creamy, rich, and scoopable vegan ice cream begins with proper ingredient preparation.
Soaking cashews softens them, creating a naturally smooth base without the need for dairy.
Using full-fat coconut milk adds creaminess while maintaining plant-based purity.
For enhanced flavor depth, blend the cacao powder and sugar thoroughly before adding extracts to ensure even distribution.
Folding in cacao nibs gently prevents them from sinking or breaking during freezing.
Finally, always allow the ice cream to soften slightly before serving for an ideal texture and rich mouthfeel.
Serving Suggestions For Chocolate Mint Treats
Serve this ice cream in bowls for a classic experience, or scoop into waffle cones for a fun presentation.
Pair with fresh berries, a drizzle of coconut caramel, or a sprinkling of crushed nuts for added texture and flavor contrast.
For an indulgent dessert, layer it between thin vegan brownies or cookies to create a mint chocolate ice cream sandwich.
A few fresh mint leaves or cacao nibs on top make for an elegant, Instagram-worthy finishing touch.
Storage Tips To Maintain Freshness
Store leftover ice cream in an air-tight, freezer-safe container to preserve flavor and prevent ice crystals from forming.
Press a piece of parchment or wax paper directly on the surface before sealing to further maintain a smooth texture.
Keep frozen at a consistent temperature and avoid frequent opening to extend shelf life.
For popsicles, remove the molds only when ready to eat and store them upright in a flat, stable position to prevent melting and shape distortion.
Proper storage ensures your dessert remains creamy and delicious for up to 2 weeks.
Frequently Asked Questions
1. Can I make this ice cream without a blender?
While a high-speed blender or Vitamix is ideal for achieving a smooth, creamy texture, you can use a strong food processor.
It may require longer processing and occasional scraping of the sides. The final texture may be slightly less silky but still delicious.
2. Can I use canned coconut milk from the shelf?
Yes, canned coconut milk works best when it’s full-fat and well-shaken. Avoid “light” versions as they can result in a thinner, less creamy ice cream.
For best results, refrigerate the can overnight and scoop the solid cream if desired.
3. How can I make this ice cream sweeter?
You can increase the coconut sugar slightly or add 1–2 tablespoons of maple syrup or agave nectar.
Be cautious with liquid sweeteners, as adding too much can affect freezing consistency. Always taste the base before freezing.
4. Is this ice cream nut-free or allergen-free?
This recipe contains cashews, so it is not nut-free. For a nut-free alternative,
you could experiment with soaked sunflower seeds or a combination of coconut cream and a seed butter, though texture and flavor may vary.
5. How long should I let the ice cream soften before serving?
For optimal scooping, allow the ice cream to sit at room temperature for 5–10 minutes.
This softens the surface without melting it completely and enhances flavor release on the palate. Popsicles can be enjoyed directly from the freezer.