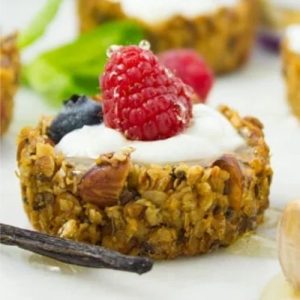
Start your morning with these vibrant Breakfast Granola Yogurt Cups, a perfect blend of creamy Greek yogurt, crunchy granola, and fresh toppings.
Packed with fiber, plant-based protein, and healthy fats from nuts and seeds, these cups provide long-lasting energy while keeping sugar and saturated fat low.
Quick to assemble, naturally satisfying, and ideal for meal prep, they’re a wholesome, delicious way to fuel your day.
Breakfast Granola Yogurt Cups
Equipment
- 1 standard muffin pan
- 12 paper baking cups
- 1 large mixing bowl
- 1 Spatula
- 1 tablespoon (for pressing granola)
- Oven
Ingredients
Dry Ingredients
- 1 1/2 cups rolled oats any type
- 1/2 cup chopped almonds
- 1/4 cup chia seeds
- 1/4 cup flax seeds
- 1 pinch salt
Wet Ingredients
- 1 teaspoon vanilla extract
- 1 tablespoon egg whites
- 1/4 cup honey
- 1/3 cup oil neutral or light flavor
Filling & Toppings
- Greek yogurt any flavor, as desired
- Fresh berries strawberries, blueberries, raspberries, etc.
- Nuts extra seeds, or a drizzle of honey
Instructions
- Preheat and Prepare Pan: Preheat your oven to 400°F (200°C) to ensure an even baking temperature. Line a standard 12-cup muffin pan with paper baking cups, pressing them gently into the molds so they sit evenly. This step prevents sticking and ensures your granola cups hold their shape perfectly once baked.
- Combine Dry Ingredients: In a large mixing bowl, add the oats, chopped almonds, chia seeds, flax seeds, and a pinch of salt. Stir everything together with a spatula until evenly distributed. This dry mix forms the crunchy base of your granola cups, giving them texture and a nutty flavor. You can also add optional ingredients like coconut flakes, dried fruits, or seeds, but make sure the ratios remain balanced with the wet ingredients.
- Mix Wet Ingredients: In a separate small bowl or directly into the dry mix, combine the vanilla extract, egg whites, honey, and oil. Stir gently with a spatula until all the wet ingredients are fully incorporated and the mixture begins to clump together. The honey and oil help bind the granola, while the egg whites give structure and stability to each cup.
- Form Granola Cups: Spoon about 1 1/2 tablespoons of the granola mixture into each paper-lined muffin cup. Using the back of your spoon or your fingers, press the mixture firmly into the base and up the sides to create a small cup shape. Make sure there are no gaps or loose bits—the tighter the granola is packed, the better the cups will hold together after baking.
- Initial Bake: Place the muffin pan in the preheated oven and bake for 8–10 minutes. Keep an eye on the cups—they should start to turn a light golden color around the edges. This first bake partially sets the structure, allowing the centers to be reshaped before finishing.
- Press Centers Again: Remove the pan from the oven carefully. Using the back of your tablespoon, gently press down the centers of each granola cup again to maintain a cup shape. This step ensures there is enough space for the yogurt filling and keeps the cups from collapsing.
- Final Bake: Return the granola cups to the oven and bake for another 6–8 minutes, or until the edges are golden brown and crisp. The cups will harden further as they cool, so don’t worry if they feel slightly soft when you first remove them from the oven.
- Cool Completely: Allow the granola cups to cool in the pan for 5–10 minutes, then carefully remove the paper liners. Place the cups on a wire rack or plate to cool completely. Cooling is crucial for achieving the perfect crisp texture and preventing the cups from breaking when filled.
- Fill with Yogurt: Once fully cooled, spoon your favorite Greek yogurt into each granola cup, filling them generously. You can use plain, vanilla, or flavored yogurt depending on your preference. The creamy yogurt contrasts beautifully with the crunchy granola, making each bite satisfying.
- Add Toppings: Top each filled cup with fresh berries, nuts, seeds, or a drizzle of honey. Sprinkle with chia seeds, flax seeds, or any crunchy toppings for extra texture, flavor, and nutrition. This step allows for creativity—experiment with seasonal fruits or your favorite nut combinations.
- Serve and Enjoy: Serve immediately for a fresh, crunchy breakfast, or store in an airtight container in the refrigerator for up to 3 days. These granola yogurt cups are perfect for quick breakfasts, meal prep, or a nutritious snack any time of day.
Notes
- Press the granola firmly into the muffin cups to ensure each cup holds its shape after baking; any loose spots can cause the cup to crumble.
- Customize your granola by adding coconut flakes, pumpkin seeds, or dried fruits—but keep the ratio of dry to wet ingredients consistent for optimal structure.
- For extra sweetness, drizzle a small amount of honey or maple syrup over the yogurt before serving.
- Let the cups cool completely before filling to maintain crispiness; warm cups will make the yogurt melt and the texture soggy.
- Experiment with different yogurt flavors and toppings to keep breakfast exciting and visually appealing.
Chef’s Secrets: Tips For Perfect Cups
The key to perfect granola yogurt cups is packing the granola tightly into the muffin pan.
Any gaps or loose areas can lead to crumbling when removing or serving.
Using a combination of oats, seeds, and nuts not only boosts fiber and protein but also creates a satisfying crunch.
For a richer flavor, lightly toast the oats and nuts before mixing.
Pressing the centers after the first bake ensures a hollow space for the yogurt and prevents collapse.
Using Greek yogurt adds creaminess and extra protein, making each bite indulgent yet healthy.
Finally, let the cups cool completely before filling to preserve their crisp texture.
Serving Suggestions: Creative Ways To Enjoy
These granola yogurt cups are versatile and perfect for both breakfast and snack time.
Top with fresh berries, sliced banana, or pomegranate seeds for a colorful, nutrient-rich presentation.
Nuts like almonds, walnuts, or pecans add a satisfying crunch, while a sprinkle of chia or flax seeds boosts omega-3s.
For a touch of indulgence, drizzle a small amount of honey or dark chocolate over the yogurt.
Pair with a warm beverage like herbal tea, coffee, or a smoothie for a balanced, filling start to the day.
These cups are also ideal for brunch gatherings or kid-friendly breakfasts—they’re visually appealing and easy to serve.
Storage Tips: Keep Cups Fresh Longer
Store your baked granola cups in an airtight container at room temperature for up to 3 days to preserve crispness.
Avoid filling with yogurt until ready to serve, as moisture from the yogurt can soften the granola.
For longer storage, freeze unfilled granola cups in a sealed freezer-safe container for up to a month; just thaw at room temperature before filling.
Yogurt-filled cups should be refrigerated and consumed within 1–2 days for optimal freshness.
Layering with parchment paper between stacked cups helps prevent sticking or breaking during storage.
Frequently Asked Questions
1. Can I make these granola cups vegan?
Yes! Replace the egg whites with a flax or chia egg (1 tablespoon flax/chia seeds + 3 tablespoons water) and use maple syrup instead of honey.
The texture will be slightly softer but still delicious and nutritious.
2. Can I use different types of oats?
Absolutely! Rolled oats work best for a sturdy, chewy base, but quick oats can be used if pressed firmly.
Steel-cut oats are not recommended as they won’t bind properly.
3. How do I prevent granola cups from breaking?
The secret is pressing the mixture tightly into the muffin cups and allowing them to cool completely before removing.
Avoid overfilling the cups, and press the center after the first bake to maintain a hollow for the yogurt.
4. Can I make these ahead for meal prep?
Yes, these cups are perfect for meal prep. Bake and cool the cups in advance, then store unfilled cups at room temperature or in the freezer.
Fill with yogurt just before serving to keep them crisp.
5. What toppings work best with these cups?
Fresh fruits like berries, kiwi, or banana, nuts such as almonds or walnuts, seeds like chia or flax, and a drizzle of honey or nut butter all work beautifully.
You can customize toppings to your taste or seasonal availability.