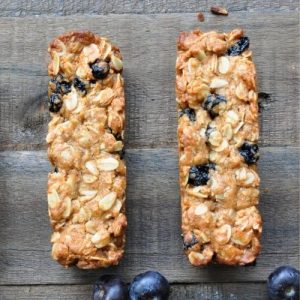
These Blueberry Lemon Granola Bars are a delightful mix of tangy citrus and naturally sweet berries, perfect for a wholesome snack.
Packed with fiber-rich oats, plant-based protein from almond butter, and healthy fats, they keep you energized and satisfied throughout the day.
Easy to make and portable, these bars are ideal for meal prep, after-school snacks, or a quick pre- or post-workout boost.
Blueberry Lemon Granola Bars
Equipment
- 1 8×8-inch baking pan
- Parchment paper (enough to line and lift bars)
- 2 Mixing Bowls
- Whisk or spoon
- Measuring Cups and Spoons
- Microwave (optional for warming almond butter mixture)
Ingredients
- ½ cup almond butter natural
- ½ cup agave nectar
- ¼ cup neutral oil e.g., avocado or coconut
- 1 tsp vanilla extract
- Zest of 1 lemon approx. 1 tsp
- ½ cup white whole wheat flour
- ½ tsp baking soda
- 2 ½ cups old-fashioned oats
- ½ cup dried blueberries
Instructions
- Preheat and Prepare the Pan: Start by preheating your oven to 350°F (175°C). While the oven warms up, line an 8×8-inch baking pan with parchment paper. Make sure the parchment hangs over the edges of the pan on two opposite sides—this will make it much easier to lift the granola bars out once they are baked. Set the prepared pan aside.
- Combine Wet Ingredients: In a microwave-safe bowl, add ½ cup of natural almond butter, ½ cup of agave nectar, and ¼ cup of neutral oil. Microwave the mixture for about 20–25 seconds until slightly warmed. Remove carefully and whisk until smooth and fully combined. This helps create a creamy, easily mixable base for the granola bars.
- Add Flavor Enhancers: To the warm almond butter mixture, stir in 1 tsp of vanilla extract and the zest of one lemon (about 1 tsp). Whisk again until the flavors are evenly incorporated. The lemon zest adds a fresh, tangy note that complements the sweetness of the agave and the richness of the almond butter.
- Mix Dry Ingredients Separately: In a large mixing bowl, combine ½ cup of white whole wheat flour, ½ tsp baking soda, and 2 ½ cups of old-fashioned oats. Stir the dry ingredients together thoroughly to ensure even distribution of the baking soda and flour. This step helps the bars hold together while maintaining a tender, chewy texture.
- Combine Wet and Dry Mixtures: Pour the almond butter mixture into the bowl with the dry ingredients. Using a spoon or spatula, stir vigorously until all ingredients are fully combined. Make sure the oats are evenly coated, and the mixture forms a cohesive dough. This may take a minute or two of thorough mixing, but it’s important for the bars to hold together after baking.
- Fold in the Dried Blueberries: Gently fold in ½ cup of dried blueberries, distributing them evenly throughout the granola dough. Avoid overmixing at this stage to prevent the berries from breaking apart. The blueberries provide bursts of natural sweetness and a chewy texture in every bite.
- Press the Mixture into the Pan: Transfer the granola mixture into the prepared baking pan. Using a spatula or your hands, press the mixture firmly and evenly into the pan. Apply pressure to compact the dough—this step is crucial to ensure the bars don’t crumble when cut later. Aim for a smooth, even layer across the entire pan.
- Bake Until Golden Brown: Place the pan in the preheated oven and bake for 18–20 minutes, or until the edges are lightly golden and the center feels set. Keep an eye on the bars in the last few minutes, as ovens may vary. Baking them too long can make the bars dry, while underbaking may cause them to fall apart.
- Cool Completely Before Removing: Once baked, remove the pan from the oven and allow the bars to cool completely in the pan, about 20–30 minutes. Cooling is essential to help the bars firm up, making them easier to remove and cut. Avoid cutting the bars while still warm, as they may crumble.
- Lift and Cut the Bars: Using the overhanging parchment paper, carefully lift the entire block of granola out of the pan. Place it on a cutting board and use a sharp knife to slice the block into 12 bars (or 16 smaller squares, if preferred). Wipe the knife clean between cuts for neat edges.
- Store and Enjoy: Store the granola bars in an airtight container at room temperature for up to one week. For longer storage, you can refrigerate them or even freeze them for a month. These bars are perfect for a quick breakfast, after-school snack, or pre- or post-workout energy boost.
Notes
- These granola bars are chewy, slightly sweet, and lightly tangy from the lemon zest.
- Pressing the mixture firmly into the pan ensures bars hold together and don’t crumble.
- The recipe can be made gluten-free by using a gluten-free flour blend and certified gluten-free oats.
- Blueberries can be swapped for dried apricots, cranberries, or raisins depending on taste preference.
- Baking time may vary slightly depending on your oven; start checking at 16 minutes if using a dark baking pan or a granola bar mold.
- Bars can be stored at room temperature, refrigerated, or frozen depending on how long you want them to last.
- These bars are perfect for meal prep and are portable for school, work, or workouts.
Chef’s Secrets For Perfect Bars
To make these granola bars truly outstanding, focus on the texture and flavor balance.
Warming the almond butter, agave, and oil just slightly makes mixing easier and ensures the bars are smooth and cohesive.
Pressing the mixture firmly into the pan is crucial—it prevents crumbling and creates a neat cut.
Don’t skip the lemon zest; it adds a bright, tangy note that pairs beautifully with the natural sweetness of blueberries.
For extra flair, lightly toast the oats before mixing to deepen the nutty flavor.
Finally, allowing the bars to cool completely before slicing ensures perfect, clean edges and a chewy, satisfying bite.
Serving Suggestions For Snack Time
These bars are versatile and can be served in many ways.
They make an excellent grab-and-go breakfast paired with a cup of yogurt or a smoothie. For a pre-workout snack, pair with a banana or a small handful of nuts for added energy.
Kids love them as an after-school treat, and adults can enjoy them alongside coffee or tea.
For a fancier presentation, drizzle a little melted dark chocolate over the top, or sandwich a layer of almond butter between two smaller bars.
These bars are also ideal for packing in lunchboxes or gym bags—they stay intact and portable.
Storage Tips To Maintain Freshness
Proper storage ensures these bars remain chewy and flavorful.
Keep them in an airtight container at room temperature for up to one week.
For longer shelf life, refrigerate the bars—they will firm up and last 2–3 weeks.
If you want to prepare in advance, these bars freeze beautifully; wrap each bar individually in parchment or plastic wrap and store in a freezer-safe container for up to one month.
To serve, thaw at room temperature for 10–15 minutes or microwave briefly for a soft, fresh-out-of-the-oven texture.
Always ensure bars are completely cooled before storing to avoid condensation and sogginess.
Frequently Asked Questions
1. Can I use other nut butters instead?
Yes! Almond butter provides a mild, nutty flavor, but peanut butter, cashew butter, or sunflower seed butter work well too.
Keep the consistency creamy to ensure the bars hold together.
2. Can these bars be made vegan?
Absolutely! This recipe is already vegan as written when using plant-based sweeteners like agave nectar.
Simply double-check any substitutions, like chocolate drizzle, to ensure they’re plant-based.
3. How do I make the bars gluten-free?
Swap the white whole wheat flour for a gluten-free all-purpose flour blend and use certified gluten-free oats.
The texture will remain chewy, and the flavor will be just as delicious.
4. Can I add extra ingredients like seeds or chocolate?
Yes! Chia seeds, flaxseeds, or pumpkin seeds can be added for extra nutrition.
Mini chocolate chips or cacao nibs can also enhance flavor—just fold them in gently to prevent melting during baking.
5. How do I prevent bars from crumbling?
Press the mixture firmly into the pan before baking and allow the bars to cool completely before cutting.
Using parchment paper to lift the bars out ensures clean slices.
Compacting the mixture and cooling are the two keys to bars that hold together perfectly.