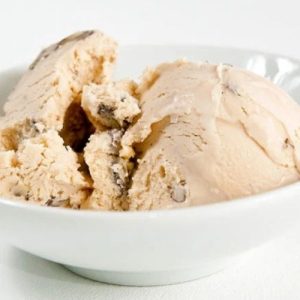
Indulge in the rich, nutty flavor of homemade Black Walnut Ice Cream, a creamy dessert that’s both satisfying and wholesome.
Packed with protein from egg yolks and heart-healthy fats from black walnuts, this treat is naturally fiber-rich and lower in added sugars.
Quick to prepare and perfect for make-ahead enjoyment, it’s an everyday dessert you’ll love.
Black Walnut Ice Cream
Equipment
- 1 heavy-bottomed saucepan (medium)
- 1 Whisk
- 1 Ladle
- 1 Ice Cream Maker
- 1 Mixing Bowl (Large)
- 1 Fine mesh strainer
- 1 container for chilling
Ingredients
- 2 cups heavy cream
- 2 cups whole milk
- 2/3 cup black walnuts roughly chopped
- 2/3 cup granulated sugar
- 1/2 vanilla bean split and scraped
- 4 –5 egg yolks
Instructions
- Heat Cream and Milk Base: In a medium heavy-bottomed saucepan, pour in the cream and milk, then add the sugar and roughly chopped black walnuts. Place the pan over medium heat and warm the mixture gently until it reaches about 170°F (77°C). You want it steaming and releasing a gentle aroma, but not boiling. This careful heating allows the sugar to dissolve fully and the walnuts to release their nutty flavor into the cream.
- Infuse Vanilla Flavor: Once the mixture reaches the right temperature, remove the pan from the heat. Add the vanilla bean pod along with its scraped seeds into the warm milk and cream mixture. Stir thoroughly so the seeds distribute evenly. Cover the saucepan and allow the mixture to sit for 1 hour. This resting time deepens the flavor, letting the black walnuts and vanilla infuse the cream beautifully.
- Chill the Mixture: After infusing, transfer the mixture to a container and place it in the refrigerator for at least 4 hours, or up to overnight. Chilling ensures the mixture becomes cold enough to churn smoothly in the ice cream maker later, and also enhances the creaminess of the final ice cream.
- Strain Nut and Vanilla Pieces: Once chilled, strain the mixture through a fine-mesh sieve to remove the vanilla pod and any walnut fragments. Reserve the strained walnut pieces in the refrigerator; these will be folded into the ice cream later to add texture and bursts of nutty flavor.
- Prepare Egg Yolks: Pour the strained mixture back into a clean saucepan. Begin warming it gently over medium heat to 160°F (71°C). While it warms, place the egg yolks in a separate bowl and whisk them until smooth. This step prepares the eggs for tempering so they do not scramble when added to the hot cream.
- Temper the Eggs Carefully: Using a ladle, slowly add a small amount of the heated cream mixture into the yolks while whisking constantly. Repeat this process, gradually adding two ladles at a time until the yolks are warmed and fully incorporated. This careful tempering allows the yolks to thicken the ice cream base without curdling.
- Cook and Thicken the Base: Return the egg-cream mixture to the saucepan. Cook gently over medium-low heat, stirring constantly for about 5 minutes. The goal is to thicken the custard slightly so it coats the back of a spoon, without ever letting it simmer or boil. This step ensures the ice cream has a smooth, creamy texture.
- Final Strain and Cool: After cooking, strain the custard one more time to remove any coagulated egg bits, ensuring a silky base. Allow the mixture to cool to at least room temperature before churning. This prevents ice crystals from forming and keeps the texture creamy.
- Churn the Ice Cream: Pour the cooled custard into your ice cream maker and churn according to the manufacturer’s instructions, until it reaches a soft-serve consistency. This process incorporates air, making the ice cream light while retaining the rich, creamy flavor.
- Fold in Reserved Walnuts: Once churned, transfer the ice cream to a large bowl and gently fold in the reserved walnut pieces. Stir carefully so the nuts are evenly distributed without breaking up the ice cream’s creamy texture.
- Freeze and Serve: Place the ice cream in a freezer-safe container and freeze for at least 2–4 hours or until firm. Serve chilled, scooped into bowls or cones. The nutty, creamy flavor makes it a perfect dessert for any occasion, from casual family nights to special celebrations.
Notes
- The prep time listed does not include chilling or churning, so plan ahead to allow sufficient refrigeration time for optimal texture.
- Using high-quality black walnuts and fresh cream dramatically enhances the flavor and creaminess.
- Tempering the eggs slowly is critical to avoid curdling and ensures a silky smooth custard base.
- Churning the ice cream until soft-serve consistency before adding the walnuts prevents them from sinking or breaking into small pieces.
- This recipe is versatile and works equally well with other nuts like pecans, hazelnuts, or even roasted almonds for variation.
Chef’s Secrets For Perfect Ice Cream
The key to exceptional ice cream is patience and attention to detail.
First, slowly heating the cream and milk with the walnuts allows the nut oils to infuse fully, creating a richer flavor profile.
Tempering the egg yolks properly is crucial; rushing this step can lead to scrambled eggs and a grainy texture.
Chilling the base thoroughly before churning ensures a smooth, creamy consistency and minimizes ice crystal formation.
For the best flavor, reserve a portion of the walnuts to fold in after churning; this preserves their crunch and prevents them from becoming soggy.
Lastly, always use fresh, high-quality ingredients—real vanilla beans and premium cream make an enormous difference.
Serving Suggestions For Everyday Enjoyment
This ice cream is versatile and can be enjoyed in multiple ways.
Serve it on its own in a bowl or cone for a simple, indulgent treat.
For a more decadent experience, pair it with warm apple pie, chocolate brownies, or a drizzle of caramel or chocolate sauce.
It also works beautifully with fresh berries or poached fruits, adding a refreshing contrast to the rich nutty flavor.
For entertaining, serve scoops in small dessert glasses garnished with crushed walnuts or a sprinkle of cinnamon for an elegant touch.
Storage Tips To Maintain Freshness
Store the ice cream in an airtight container to prevent freezer burn and maintain its creamy texture.
For best results, press a piece of parchment paper directly onto the surface before sealing.
Keep it in the coldest part of the freezer, avoiding frequent opening.
Homemade ice cream is best consumed within two weeks, as it may lose texture and flavor over time.
If it becomes too hard, allow it to sit at room temperature for a few minutes to soften before scooping.
Frequently Asked Questions
1. Can I use other nuts instead?
Absolutely! Pecans, hazelnuts, or even almonds work well. Toast them lightly to enhance their flavor before adding them to the cream mixture.
2. How do I prevent ice crystals from forming?
Chill the custard thoroughly before churning and ensure your ice cream maker bowl is properly frozen.
Adding the nuts after churning also keeps the texture smooth.
3. Can I make this dairy-free?
You can substitute coconut milk or almond milk for the cream and milk, though the texture will be slightly lighter.
Coconut cream works best for creaminess.
4. How long does homemade ice cream last?
It is best eaten within 2 weeks for optimal flavor and texture. Store in an airtight container in the coldest part of the freezer.
5. Do I have to temper the eggs?
Yes, tempering is essential to avoid scrambling the yolks.
Slowly adding the hot cream to the yolks while whisking ensures a smooth custard without lumps.