These Biscoff Cookie Butter Blondie Brownies are soft, chewy, and indulgently flavorful, combining the richness of cookie butter with a light, moist brownie texture.
Packed with good fats from butter and a touch of natural sweetness, they’re a quick, satisfying treat that works perfectly for snack time, dessert, or even meal-prep-friendly sweet bites that keep everyone happy.
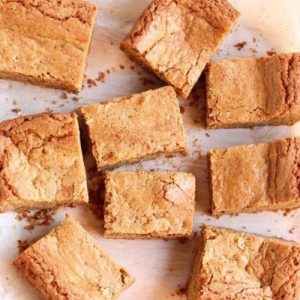
Biscoff Cookie Butter Blondie Brownies
Equipment
- 9 x 9-inch metal baking pan
- Parchment paper
- Medium Mixing Bowl
- Large mixing bowl
- Hand or stand mixer
- Spatula
- Measuring Cups and Spoons
Ingredients
- 2 cups all-purpose flour
- 1 teaspoon baking powder
- 1/4 teaspoon baking soda
- 1 teaspoon salt
- 3/4 cup solid chilled butter (unsalted)
- 1 cup light brown sugar packed
- 1/2 cup granulated sugar
- 2 large eggs lightly beaten
- 2 teaspoons vanilla extract
- 1/2 cup smooth Biscoff cookie butter
- 2 teaspoons butter for greasing the pan
Instructions
- Preheat Oven Properly: Begin by setting your oven to 350°F (175°C) to ensure it reaches the perfect temperature while you prepare the batter. Preheating is key to even baking, helping your blondies cook through without burning the edges or undercooking the center.
- Prepare the Baking Pan: Grease and Line Pan: Take a 9 x 9-inch metal baking pan and lightly coat all sides with 2 teaspoons of butter. This helps the parchment paper stick and prevents the blondies from sticking.
- Add Parchment Paper: Cut a piece of parchment paper slightly larger than the pan so it hangs over the sides. Press it firmly into the corners, smoothing out any wrinkles. The overhang will act as handles for easily lifting the blondies from the pan after baking. Ensure the paper lies flat to avoid uneven baking.
- Mix Dry Ingredients: In a medium mixing bowl, combine 2 cups of all-purpose flour, 1 teaspoon baking powder, 1/4 teaspoon baking soda, and 1 teaspoon salt. Whisk thoroughly to ensure all ingredients are evenly distributed. This step guarantees a consistent texture in the final blondie batter and prevents clumping.
- Melt Butter Perfectly: Place 3/4 cup of solid, chilled butter in a large microwave-safe bowl. Cover with a paper towel to prevent splattering. Microwave for 30–40 seconds, just until softened and barely melted. The goal is to warm the butter without making it hot, which could cook the eggs prematurely and affect the texture of your blondies.
- Combine Sugars and Butter: To the melted butter, add 1 cup packed light brown sugar. Stir until combined. Then, add 1/2 cup granulated sugar and mix again until smooth. This step creates a rich, sweet base for your blondie batter, giving it that classic chewy texture.
- Incorporate Eggs and Vanilla: Lightly beat 2 large eggs and 2 teaspoons vanilla extract in a separate bowl. Add them to the butter and sugar mixture, then beat using a hand or stand mixer on medium speed until fully smooth. The eggs provide structure and moisture, while vanilla enhances the flavor depth of the blondies.
- Gradually Add Dry Ingredients: Add the dry flour mixture in small spoonfuls to the wet batter. Mix slowly on the lowest speed setting to prevent flour from puffing into the air. Continue until all the flour mixture is fully incorporated. The batter should be thick, smooth, and slightly glossy at this point.
- Fold in Biscoff Cookie Butter: Spoon 1/2 cup smooth Biscoff cookie butter onto the batter. Using a spatula, fold it gently into the mixture in a swirling motion. This creates a beautiful marbled pattern and ensures every bite has pockets of creamy, spiced cookie flavor. Avoid overmixing to preserve the swirl effect.
- Spread Batter in Pan: Transfer the batter to the prepared baking pan. Use a spatula to spread it evenly, pressing lightly to ensure uniform thickness. Smooth the top to prevent uneven baking and help the blondies rise consistently.
- Bake Until Golden: Place the pan in the preheated oven and bake for approximately 32 minutes. Look for visual cues: the edges should turn light golden brown and slightly pull away from the pan. The center should still appear slightly soft—it will firm up as it cools. Baking time may vary slightly depending on your oven, so keep an eye after 30 minutes.
- Cool Completely: Once baked, remove the pan from the oven and place it on a cooling rack. Let the blondies cool completely in the pan—about 1 hour. Cooling in the pan allows them to set, making cutting easier while maintaining their chewy texture.
- Lift Out and Slice: Use the parchment paper “handles” to carefully lift the blondies from the pan onto a large cutting board. Keep them on the parchment for slicing. Use a sharp knife to cut into 9–12 squares, depending on your preferred serving size. Wipe the knife clean between cuts for neat edges.
- Serve and Enjoy: These blondies can be enjoyed as finger food or with a fork. Serve plain, or pair with a scoop of ice cream or a drizzle of chocolate sauce for an extra indulgent treat. They’re perfect for dessert, snacks, or sharing at gatherings.
Notes
- Always use a metal 9 x 9-inch baking pan for thicker, chewier blondies. Glass pans may alter cooking time and temperature.
- Chilled butter ensures that the eggs don’t curdle when combined, creating a smooth, velvety batter.
- Parchment paper makes removal easy and promotes even baking while preventing sticking.
- For best results, measure flour accurately—spoon it into your cup and level it off to avoid dense blondies.
- Slightly underbaking in the center is ideal; the blondies will continue to firm up as they cool, yielding a soft, chewy texture.
Chef’s Secrets: Perfect Chewy Blondies Everytime
To achieve the ultimate chewy texture, never overmix the flour into the wet ingredients.
Gentle folding keeps the batter light and prevents dense blondies.
Swirling in Biscoff cookie butter at the end ensures each piece has pockets of gooey, spiced flavor.
Using chilled butter slightly melted gives the eggs a gentle environment, preventing curdling while producing a smooth, rich batter.
For even baking, smooth the batter evenly in the pan and avoid overfilling corners.
Serving Suggestions: Delicious Ways To Enjoy
These blondies shine on their own as a finger-friendly snack, but you can elevate them effortlessly.
Pair them with a scoop of vanilla ice cream or drizzle with chocolate or caramel sauce for a dessert experience.
Crushed nuts, whipped cream, or a dusting of powdered sugar can add texture and visual appeal.
They also work beautifully cut into smaller squares for lunchboxes, afternoon tea, or potluck events, making them versatile for everyday enjoyment.
Storage Tips: Keep Blondies Fresh Longer
To maintain freshness, store cooled blondies in an airtight container at room temperature for up to 3–4 days.
For longer storage, wrap squares individually in plastic wrap or foil and freeze for up to 2 months.
When ready to enjoy, thaw at room temperature or warm briefly in the microwave to restore softness.
Avoid refrigerating for extended periods, as it can dry out the blondies and make them less chewy.
Frequently Asked Questions
1. Can I use a glass baking pan instead?
Yes, but reduce the oven temperature by 25°F and monitor the baking time closely, as glass heats differently than metal.
Your blondies may cook slightly faster on the edges, so check for doneness earlier.
2. Can I substitute the Biscoff cookie butter?
You can, though using a similar spiced cookie spread or peanut butter will alter the flavor slightly.
Biscoff is recommended for its unique caramelized spice taste.
3. How can I make the blondies extra chewy?
Slightly underbake them and allow them to cool completely in the pan.
Using brown sugar over white sugar contributes to moisture and chewiness.
4. Can I make this recipe dairy-free?
Yes, swap the butter with a plant-based alternative and ensure the Biscoff spread used is dairy-free.
The texture may be slightly different but still delicious.
5. How should I cut the blondies neatly?
Use a sharp knife, wipe it clean between cuts, and lift the entire slab with the parchment paper.
Cooling completely ensures cleaner slices without crumbling.