These Banana Cream Pie Bars are a refreshing, no-bake treat perfect for warm days.
Creamy layers of banana, cream cheese, and light pudding come together effortlessly, making them quick and satisfying.
Rich in potassium and a modest source of protein, they provide a wholesome, indulgent snack or dessert that’s fiber-friendly, easy to prep, and perfect for everyday enjoyment.
Banana Cream Pie Bars
Equipment
- 1 8×8-inch baking dish
- Parchment paper
- Food processor or blender
- Medium mixing bowls (2)
- Hand mixer or whisk
- Rubber spatula
- Measuring Cups and Spoons
Ingredients
Crust
- 2 cups vanilla wafers crushed (~1 cup crumbs)
- ¼ cup 57 g unsalted butter, melted
- 1 pinch kosher salt
Cream Cheese Layer
- 8 ounces cream cheese softened
- ½ cup 100 g granulated sugar
- 1 teaspoon vanilla extract
- 1 cup 120 g Cool Whip, thawed
- 2 ripe bananas sliced into ¼-inch rounds
Pudding Layer
- 1 box 3.4-ounce instant banana pudding mix
- 1 ¼ cups whole milk
- ½ cup 60 g Cool Whip, thawed
Toppings
- 1 ½ cups 180 g Cool Whip, thawed
- Vanilla wafers crushed (optional)
- Fresh banana slices optional
Instructions
- Prepare the Pan: Line an 8×8-inch baking dish with parchment paper, ensuring that the paper hangs over the edges on two opposite sides. This overhang will make it much easier to lift the finished bars from the pan without damaging the layers. Lightly grease the parchment paper with a small amount of butter or nonstick spray to prevent sticking.
- Crush the Vanilla Wafers: Place 2 cups of vanilla wafers into a food processor or blender. Pulse until the cookies form fine crumbs, resembling coarse sand. If you don’t have a processor, place the wafers in a large zip-top bag and crush them with a rolling pin. The fine crumbs will help the crust hold together firmly and create a smooth base for the creamy layers.
- Make the Crust: Transfer the crushed wafers to a medium mixing bowl. Add ¼ cup of melted unsalted butter and a pinch of kosher salt. Mix thoroughly with a spatula or spoon until all crumbs are coated and the mixture has a wet-sand texture. Press this mixture evenly into the bottom of your prepared baking dish using the bottom of a measuring cup or glass to compact it firmly. Chill in the refrigerator for 10 minutes to allow the crust to set and form a solid base.
- Prepare the Cream Cheese Layer: In a separate medium bowl, add 8 ounces of softened cream cheese. Using a hand mixer, beat on medium speed until smooth and creamy, with no lumps remaining. Gradually add ½ cup granulated sugar and continue to beat for 2–3 minutes until fully incorporated. Mix in 1 teaspoon of vanilla extract, ensuring it is evenly blended for a consistent flavor.
- Fold in Whipped Topping: Gently fold 1 cup of thawed Cool Whip into the sweetened cream cheese mixture using a rubber spatula. Use a folding motion to maintain the light, airy texture. Avoid overmixing, as you want the cream cheese layer to remain fluffy and smooth. Once fully combined, spread the mixture evenly over the chilled crust, smoothing the surface with the spatula.
- Layer the Fresh Bananas: Slice 2 ripe bananas into ¼-inch rounds. Arrange the slices evenly over the cream cheese layer, covering the surface without overlapping too much. The banana layer provides natural sweetness, moisture, and a beautiful visual contrast between the creamy layers.
- Prepare the Pudding Layer: In a medium bowl, whisk together 1 box (3.4-ounce) of instant banana pudding mix and 1 ¼ cups of whole milk for approximately 2 minutes. The mixture will begin to thicken as the pudding sets. Once slightly thickened, fold in ½ cup of thawed Cool Whip, combining gently to maintain a light, airy texture.
- Add the Pudding Layer: Pour the pudding mixture evenly over the banana slices, spreading carefully with a spatula to cover the entire surface. Take care not to disturb the banana layer beneath too much. Smooth the top for an even finish and a visually appealing presentation.
- Chill and Set: Cover the baking dish with plastic wrap or foil and place it in the refrigerator. Allow the bars to chill for at least 4 hours, or until the pudding layer is fully set and the dessert is firm. This step ensures that each layer holds its shape when sliced and the flavors meld together perfectly.
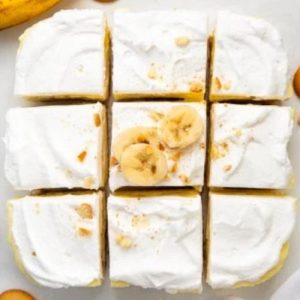
- Add the Topping: Once fully chilled, remove the bars from the fridge. Spread 1 ½ cups of thawed Cool Whip evenly over the top, smoothing it with a spatula for a clean finish. For added texture and visual appeal, sprinkle with crushed vanilla wafers and decorate with a few fresh banana slices if desired.
- Slice and Serve: Use the parchment paper overhang to carefully lift the dessert from the pan. Place on a cutting board and slice into 9 equal bars using a sharp knife. For cleaner slices, wipe the knife with a warm, damp cloth between cuts. Serve immediately or keep chilled until ready to enjoy.
Notes
- Use ripe bananas for the best natural sweetness and creamy texture.
- Softened cream cheese ensures a smooth and lump-free layer.
- Thawed Cool Whip is essential for folding without breaking the fluffy texture.
- Press the crust firmly to prevent it from crumbling when slicing.
- Chill the dessert for at least 4 hours to allow all layers to set properly.
- Slice bars with a sharp knife and wipe between cuts for clean edges.
- Optional toppings like crushed wafers or banana slices add extra flavor and presentation appeal.
Chef’s Secrets for Perfect Bars
Achieving the perfect Banana Cream Pie Bars comes down to texture and layering.
Start by crushing the vanilla wafers finely and combining them with butter, which creates a firm but tender crust.
Always fold in the Cool Whip gently into the cream cheese and pudding layers to preserve the airy texture—overmixing will result in a denser filling.
Using ripe bananas ensures natural sweetness and prevents the dessert from tasting bland.
For an added touch of flavor, lightly brush banana slices with lemon juice to prevent browning.
Chill for the full recommended time; patience ensures that every slice holds together beautifully.
Serving Suggestions for Summer Desserts
These bars are versatile and can be served in multiple ways.
For a classic presentation, serve them chilled as is, with a few extra banana slices and a sprinkle of crushed vanilla wafers on top.
For gatherings or parties, cut into bite-sized squares and arrange on a dessert tray for an elegant touch.
Pair with a cup of lightly brewed coffee, iced tea, or fresh fruit salad for a refreshing summer treat.
They also make a sweet addition to brunch menus or picnic spreads.
Storage Tips to Maintain Freshness
Store Banana Cream Pie Bars in an airtight container in the refrigerator to maintain freshness and creaminess for up to 4–5 days.
For longer storage, you can freeze individual slices wrapped tightly in plastic wrap and foil; thaw in the refrigerator for several hours before serving.
Avoid leaving the bars at room temperature for extended periods, as the cream and pudding layers may soften excessively.
When ready to serve, garnish with fresh banana slices to restore visual appeal, as these can brown slightly during storage.
Frequently Asked Questions
1. Can I make these bars ahead of time?
Absolutely! These bars benefit from resting in the fridge for several hours, allowing the layers to set fully.
You can prepare them a day in advance for a convenient, stress-free dessert.
2. Can I use a different type of cookie for the crust?
Yes! Graham crackers, shortbread, or even chocolate wafers can be substituted, but the flavor and texture will vary slightly.
Ensure the cookies are finely crushed and mixed with melted butter for a firm crust.
3. Can I make this dessert dairy-free?
You can replace the cream cheese and Cool Whip with plant-based alternatives.
Use dairy-free cream cheese and coconut whipped topping for a similar texture, but note that flavor may be slightly different.
4. How do I prevent the banana slices from browning?
Brush the banana slices with a small amount of lemon juice or pineapple juice before layering.
This helps maintain their fresh, golden color and prevents discoloration during chilling.
5. Can I double the recipe for a larger batch?
Yes, simply use a larger pan (like 9×13 inches) and double all ingredients. Adjust chilling time slightly to ensure the layers set completely.
Slicing may require a larger knife for clean cuts.