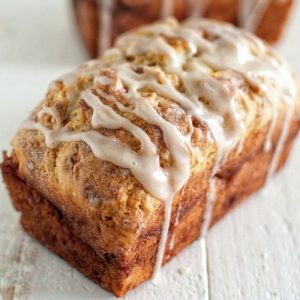
Warm, spiced, and irresistibly soft, this Apple Cinnamon Buttermilk Bread is a cozy treat perfect for breakfast, snacks, or dessert.
Packed with fiber-rich apples, protein from eggs, and heart-healthy fats from vegetable oil, it’s a wholesome option for everyday baking.
Quick to prepare and satisfying, this bread combines flavor, nutrition, and convenience in every slice.
Apple Cinnamon Buttermilk Bread
Equipment
- 2 × 9-inch loaf pans (for large loaves)
- 1 × medium saucepan
- 1 × Large mixing bowl
- 1 × Whisk
- 1 x Spatula
- Measuring Cups and Spoons
- Baking spray or butter for greasing
Ingredients
Cinnamon Sugar:
- 2 cups granulated sugar
- 2 tbsp ground cinnamon
Bread Batter:
- 2 cups buttermilk
- 2 large eggs
- ½ cup vegetable oil
- 1½ cups granulated sugar
- 4 cups all-purpose flour
- 2 tsp baking soda
- 1 tsp salt
Apple Filling:
- 2 large Honeycrisp apples peeled, cored, diced
- ⅓ cup cinnamon sugar from above
- 2 tbsp butter
Glaze:
- 1¼ cups powdered sugar
- 1 tbsp boiled apple cider
- ½ tsp apple pie spice
- 2 tbsp milk adjust as needed for consistency
Instructions
- Prepare Cinnamon Sugar Mixture: In a medium-sized bowl, combine 2 cups of granulated sugar with 2 tablespoons of ground cinnamon. Mix thoroughly until the sugar is evenly coated with cinnamon and has a warm, aromatic color. Set this mixture aside for later use, as it will be used both in the bread layers and for coating the pans.
- Cook Apple Filling: Peel, core, and dice 2 large Honeycrisp apples into small, uniform pieces to ensure even cooking. In a medium saucepan over medium heat, add the diced apples, ⅓ cup of the prepared cinnamon sugar, and 2 tablespoons of butter. Stir frequently as the butter melts and coats the apples. Cook until the apples soften slightly but still hold their shape, about 5-7 minutes. Remove from heat and allow the filling to cool to room temperature, which will prevent the hot apples from melting the bread batter when layered.
- Prepare Loaf Pans: Spray two 9-inch loaf pans generously with baking spray or lightly coat with butter to prevent sticking. Sprinkle 2 tablespoons of cinnamon sugar into each pan and tilt to coat the bottom and sides evenly. This creates a sweet, flavorful crust on the bread’s exterior. Set the pans aside while preparing the batter.
- Mix Wet Ingredients for Bread: In a large mixing bowl, pour in 2 cups of buttermilk. Add 2 large eggs and ½ cup of vegetable oil. Whisk these ingredients together until fully combined and smooth. Gradually add 1½ cups of granulated sugar to the wet mixture, whisking continuously until the sugar dissolves and the batter becomes slightly thick but still pourable. This mixture provides moisture, tenderness, and natural sweetness to the bread.
- Combine Dry Ingredients: In a separate bowl, whisk together 4 cups of all-purpose flour, 2 teaspoons of baking soda, and 1 teaspoon of salt. Make sure the baking soda is evenly distributed throughout the flour to ensure proper rising.
- Incorporate Dry Ingredients into Wet Mixture: Gradually fold the dry ingredients into the wet mixture using a spatula or wooden spoon. Stir just until blended. The batter should be slightly lumpy — overmixing will result in dense bread. Scrape the sides and bottom of the bowl to ensure all flour is incorporated, but stop mixing as soon as the batter comes together.
- Layer Batter in Loaf Pans: Divide the batter in half and spoon the first half evenly into the prepared loaf pans, spreading gently with a spatula. Sprinkle a portion of the remaining cinnamon sugar over the batter, creating a thin, sweet layer. Carefully spoon the cooled apple filling over the batter, distributing it evenly. Top with the remaining batter, spreading gently to cover the apples completely. Finally, sprinkle the last of the cinnamon sugar over the top, giving the bread a sweet, caramelized crust after baking.
- Bake the Bread: Preheat your oven to 350°F (175°C). Place the prepared loaf pans on the center rack of the oven. Bake large loaves for 45-60 minutes, or until a toothpick inserted into the center comes out clean. Mini loaves will take slightly less time, approximately 35-45 minutes. Keep a close eye on the bread during the last 10 minutes of baking to prevent over-browning.
- Cool the Loaves: Once baked, remove the loaf pans from the oven and allow them to cool for about 10-15 minutes. Carefully run a spatula or butter knife along the edges to loosen the bread from the pan. Transfer the loaves to a wire cooling rack to cool completely before glazing. Cooling ensures the bread sets properly and prevents the glaze from melting into the loaf.
- Prepare Apple Glaze: In a small mixing bowl, combine 1¼ cups powdered sugar, 1 tablespoon boiled apple cider, ½ teaspoon apple pie spice, and 2 tablespoons milk. Whisk the ingredients together until smooth. Adjust the consistency by adding milk, 1 teaspoon at a time, until the glaze is pourable but thick enough to cling to the bread. The glaze adds a sweet, spiced finish that enhances the apple flavor.
- Glaze the Bread: Once the loaves are completely cool, drizzle the prepared glaze generously over the top, allowing it to drip naturally down the sides. This creates a beautiful, glossy finish while adding an extra layer of sweetness. Allow the glaze to set for 10-15 minutes before slicing.
- Storage Instructions: After glazing, wrap the cooled loaves in wax paper, then tightly in plastic wrap to preserve freshness. Store at room temperature for up to 3 days, or freeze for longer storage. Mini loaves are perfect for grab-and-go breakfast or snacks, making this recipe ideal for meal prep.
Notes
- For best results, use Honeycrisp or Fuji apples for a naturally sweet, crisp texture.
- Do not overmix the batter; a few lumps ensure a tender, moist bread.
- Cinnamon sugar sprinkled on the pan and batter creates a caramelized crust and enhances flavor.
- Loaves can be baked in 9-inch pans for large servings or in mini loaf pans for quicker baking.
- Let the apple filling cool completely before adding to the batter to prevent sinking or uneven layers.
- Adjust glaze consistency with small increments of milk to avoid a runny finish.
- Bread can be served warm or at room temperature; slicing when completely cooled prevents crumbling.
Chef’s Secrets For Perfect Bread
To achieve the softest, most flavorful Apple Cinnamon Buttermilk Bread, pay close attention to the layering and mixing process.
Always mix wet and dry ingredients just until combined; overmixing develops gluten and can make the bread dense.
The secret to evenly distributed apple filling is allowing it to cool slightly, which prevents it from sinking.
Sprinkling cinnamon sugar in the pan and between batter layers not only adds sweetness but also creates a beautiful, lightly caramelized crust.
For an extra touch, lightly toast the apples in butter before folding them in to intensify their flavor.
Serving Suggestions For Any Occasion
This bread is versatile and works for breakfast, snack time, or dessert.
Serve warm with a pat of butter or a light drizzle of honey for a cozy morning treat.
Pair slices with a cup of coffee or spiced chai for a comforting afternoon snack.
For dessert, add a dollop of whipped cream or vanilla ice cream to each slice.
Mini loaves make convenient grab-and-go options for lunchboxes or coffee breaks, while large loaves are perfect for family gatherings or brunch spreads.
Storage Tips To Maintain Freshness
Once fully cooled, wrap each loaf tightly in wax paper and then plastic wrap to lock in moisture.
At room temperature, the bread will stay fresh for 2-3 days.
For longer storage, place wrapped loaves in the freezer for up to 3 months; thaw overnight in the refrigerator or at room temperature before serving.
Mini loaves can be individually wrapped for easy portioning.
The glaze is best applied fresh before serving, but you can store it separately in the fridge for a few days and drizzle when ready to eat.
Frequently Asked Questions
1. Can I use a different type of apple?
Yes! Honeycrisp or Fuji apples work best for sweetness and texture, but Gala, Braeburn, or Granny Smith can also be used.
Adjust cinnamon sugar slightly if using tart apples.
2. Can I make this bread dairy-free?
Absolutely. Substitute buttermilk with a mixture of plant-based milk and a teaspoon of vinegar or lemon juice.
Use a vegan butter or oil in place of regular butter for the apple filling.
3. How do I prevent the apples from sinking?
Allow the apple filling to cool completely before layering it in the batter.
Additionally, lightly dust diced apples with a teaspoon of flour; this helps them stay suspended evenly in the bread.
4. Can I prepare this recipe ahead of time?
Yes, you can prepare the batter and apple filling in advance.
Store separately in the refrigerator for up to 24 hours and assemble just before baking.
This helps the flavors meld while keeping the batter fresh.
5. Can I skip the glaze?
Certainly! The bread will still be moist and flavorful without the glaze.
You can also lightly dust with powdered sugar or serve plain for a less sweet, everyday-friendly option.